Tag: honeybees

  • Inside the Hive: Views from a First Year Beekeeper (Scene 8)

    Inside the Hive: Views from a First Year Beekeeper (Scene 8)

    Everything about honeybees is interesting to me. I have seen this brood layout in several hives and I think it is interesting that bees make this sunrise-shaped brood pattern. So, what you are seeing here is capped brood in the center of the frame with some open cells – some were cleaned out, some had larva in them. Outside that center brood pattern is capped and uncapped honey.

    I’ve been wondering why the bees tend to lay out their brood like this – certainly it is convenient to have stores near the brood. It is also interesting that they don’t mix brood and stores together, right? But I guess that just makes sense because otherwise the queen would need to work around the stores to find the cells where she can lay her eggs. Hives seem to be very orderly places where bees have their tasks to do, cells are neatly arranged and activities appear to be carried out automatically. Certainly there are a bucket of mysteries that still remain about honeybees despite the fact that they are the second most studied creature after humans.

    Enjoy,

    Matt

    Read all of Matt’s Inside the Hive Posts here

    Matt (twitter @MattInTheGarden) loves berries of all sorts though he’s not a fan of cherries. Weird, huh? He is neither tone deaf nor color blind but can’t carry a tune and is particularly unskilled at matching clothes. Matt loves to listen to Radio Lab and is quite jealous of Jad and Robert. They’ve got an awesome job.

  • Inside the Hive: Views from a First Year Beekeeper (Scene 7)

    Inside the Hive: Views from a First Year Beekeeper (Scene 7)

    Hey there folks. In this scene from the hive, I’d like to show off something that my son and I saw today during our inspection of hive #2 (the hive from my mentor’s nuc). I almost missed this because it was quite hot out today with no breeze whatsoever. It was the first time we’d used the smoker and, quite honestly, it seemed to agitate the bees more. We’ll work on that.

    In the center of the picture you can see a bee emerging from its cell. When we pulled this frame, we could see her antennae poking out of the cell and within just a minute or two, she’d popped her head out.

    About 5 cells above this there is a bee which appears to be in the pupa stage (which is a capped stage) but it was open. Unfortunately the close-up of this didn’t turn out. I think it might have been dead. If you have thoughts on this, I’d like to hear them.

    Enjoy,

    Matt

    Read all of Matt’s Inside the Hive Posts here

    Matt (twitter @MattInTheGarden) enjoys the heck out of cooking and eating ribs and is particularly enamored with his brown sugar dry rub. Insanely delicious. Matt thinks This Old House’s Tom Silva is really cool. He likes iced tea with lemon and sharp cheddar cheese – not together, of course.

  • Inside the Hive:  Views from a First Year Beekeeper (Scene 6)

    Inside the Hive: Views from a First Year Beekeeper (Scene 6)

    I wanted to talk about a couple of topics related to this photo – mite control and wax production. There are two mites which are parasitic in the honeybee hive – the Varoa Mite, which literally sucks the life out of the bee externally and the Tracheal Mite which feeds of the bee from within its respiratory system. Varoa is large enough that one can see it with the naked eye while Tracheal mites are too small to see without a microscope. In the upper part of this picture are two “grease patties” which are made of equal parts of vegetable shortening and sugar. Mixed and formed into a patty, these are most easily handled by putting waxed paper between them. Sometimes folks will put some essential oils in the mixture, such as wintergreen. The idea here is that the bees are attracted to the sugar in the patty and get the vegetable shortening on them, greasing them up a bit. Tracheal mites are spread bee-to-bee and have considerable difficulty with the grease. There are a number of ways to deal with tracheal mites, some of which are more harsh than others. What I like about the grease patty approach is that it is something that is both inexpensive and harmless to the bees. These patties go a long way so you dont’ need a bunch of them – maybe one or two per hive per year. How effective is the grease patty treatment? I don’t know, quite honestly, but it is mentioned quite often.

    The zip-top bag (When J&J starts sponsoring GardenFork, I’ll consider using its brand name) in the picture is called a “baggy feeder” and is filled with a 1:1 sugar syrup (1:1 by weight, so 5 pints of water to a 5 pound bag of sugar) that is super simple to make – you could just put the water in the sun and stir the sugar in after a few hours of letting it heat up. Alternatively you can heat the water a bit on the stove (no need to boil it whatsoever), take it off the heat and stir in the sugar. Fill the bag and seal the top. Then lay the bag down on its side (making sure the top is zipped) and cut a small slit in the side of the bag so that the air escapes and the sugar syrup oozes out a bit. As the bees walk on it, they’ll be able to feed on the syrup that comes out.

    Now, the idea with the baggy feeder (or any feeder for that matter) is that the bees in this new hive require a considerable amount of energy to produce wax to create comb on the frames and to fly about and forage. They’ll certainly go out and find nectar but providing a ready source of sugar water gives them all the food they can eat right in the hive and helps the bees “draw out” the comb quickly. In a new hive there’s a lot of wax to produce and shape into comb and the bees will readily take this syrup up and produce remarkable amounts of wax in a short time. As I’m not getting honey from the hives this year (at least this is my expectation), I don’t mind the bees feeding off of sugar water. When they are producing honey for human consumption, you’ll want them to be creating it from nectar rather than just storing up sugar water. I wouldn’t want to purchase (or sell!) honey that was just converted sugar water.

    The nice thing about the baggy feeder is that it is cheap and convenient. The undesirable thing about the baggy feeder is that it is really a one-use feeder and can be a bit messy. I’m changing my hives over to inverted mason jars with punctured lids for feeders. Those are easily swapped out and will last for decades. There are many other feeders out there – frame feeders, hive top plastic feeders, entrance feeders. They all work but have their plusses and minuses. I’ll report later about how my mason jar feeders work.

    Enjoy,

    Matt

    Read all of Matt’s Inside the Hive Posts here

    Matt (twitter @MattInTheGarden) likes sudoku, minesweeper and the “Ticket to Ride” board game. He’s a huge fan of Ze Frank and enjoys the listening to Dan Carlin’s Common Sense. He’s got a “live and let live” attitude toward life and enjoys a good cheeseburger and baked potato wedges with roasted garlic spread on them. In his spare time he writes software.


  • Inside the Hive:  Views from a First Year Beekeeper (Scene 5)

    Inside the Hive: Views from a First Year Beekeeper (Scene 5)

    How do I start a hive? Good question. I asked this myself and of Eric when we talked on GardenFork Radio and via email. Well, you’re going to need some bees and that is the topic of this particular photo. What I am holding here is called a “bee package” and weighs a bit more than 3 pounds. It is a simple wooden box that has screen tacked onto two sides to provide ventilation to the bees within. On the east coast folks down in Georgia literally shake a few pounds of bees down into a cone that is jammed into the top of this box. If you’ve seen videos of this process, you’ll notice that there are bees everywhere. I can imagine the bees don’t like it all that much, but that’s how it goes in the bee package business. There are thousands of bees in this box and one thing that you’ll notice when picking up the box is that it is warm. Bees generate a fair amount of heat and I could feel their warmth through the thin wood of the package.

    They tend to cluster around a queen cage that is hanging down from the top of the box and around a can of sugar syrup that is inverted and rests upon a ledge in the center of the can. You can’t see either of those things in this particular image, but you can see the thin square of wood that is tacked to the top of the package and covers the hole where the syrup can and queen cage are. The majority of the bees stay toward the top of the box though some will move around along the bottom. One point I want to make is that there will be dead bees in the package. I had approximately 1/2″-3/4″ of dead bees in the box after the live ones had vacated it and move into their hive. This is an expected situation, though if you’ve got an inch or more of dead bees you might want to raise some questions about how they were handled, etc. As a recycling guy, I knocked all the dead bees out of the box and into my compost bin, figuring that it was as good a place as any for them, but that’s a story for another day.

    At package pickup I wore my beekeeper suit, veil and gloves but it wasn’t really required (though we did have one package break open and there were bees flying about) and my son and I did it mostly because we wanted to break in our suits. The bees can’t sting you through the wood (obviously) and so handling the package with bare hands and no bee suit is fine for transport.

    I left my package in the garage for a couple of days until conditions were better for installing them into the hive. As long as the bees are not subjected to the hot sun and have food and water (which they do from the syrup can), they’ll be fine if you must delay a day or so. I had my son spray a little 1:1 sugar water on them – just a spritz – twice a day while they were in the garage. I don’t know that they would have done any worse if he hadn’t sprayed them, but I’m sure they were happy with the sugar water and it made us feel like we were tending to their needs while we waited for the adverse weather to pass.

    Enjoy,

    Matt

    Read all of Matt’s Inside the Hive Posts here

    Matt (twitter @MattInTheGarden) makes his living worrying about software efficiency, asynchronous program execution and end-user needs. When he’s not driving the desk, he can be found listening to podcasts like GardenFork Radio while he tends to his hobby farm in Virginia. Matt quite dislikes pickled beets and liver. His miniature Sicilian donkey is unimpressed by Matt’s musical tastes and mostly just wants him to feed her carrots and apples. 


  • Inside the Hive:  Views from a First Year Beekeeper (Scene 4)

    Inside the Hive: Views from a First Year Beekeeper (Scene 4)

    This picture is from the installation of hive #2, which is from a nucleus hive, commonly called a “nuc”, from my beekeeping mentor’s bee yard. My mentor has eleven hives and this year had a half dozen nucs as well. Our beekeepers association encourages new beekeepers to buy nucs from local folks. This is a good idea for a number of reasons, not the least of which is that each nucleus hive inspected and sold locally is one less package from out of state that is shipped here. Why is that good? Because the nucleus hive is 4 or 5 frames of fully drawn comb with bees, a queen, brood (eggs, larva, capped brood) and some stores (honey, pollen, etc.) and the bees are already well establish with the queen and don’t have to spend a lot of time and energy drawing out comb before things get moving in the hive. The queen is already mated and laying. These are good things.

    My son and I enjoy working the bees together. He’s a fine teenager and a very calm and methodical person around the hives. He exhibits some of the characteristics of a good beekeeper, particularly knowing not to rush. Here he is setting up the hive  himself. I mostly just took pictures during this install.

    Our hive sits on a hive stand. Mine is painted brown (because I had brown paint) and it gets the hive off the ground and up where it is easier to work. Raising it up provides more ventilation and keeps me from having to bend over so much. Some folks use pallets, cinder blocks, bricks and other things in lieu of a stand like I have. Whatever works. I had the wood, the paint and the time so I built one. I bought some concrete piers to set it on to get the wood off the ground and to raise it up a few more inches. Again, whatever works. The bees won’t care at all.

    The first piece of the hive is a “landing board” which provides a place, as the name suggests, for the bees to land when returning to the hive. I built mine but you could purchase one from a number of sources too. Landing boards aren’t absolutely necessary and I would guess that most hives don’t have them, but I liked the idea and had the wood, so I made a pair of them for my hives. The landing board is the slanted piece here directly on the hive stand at the bottom of this picture.

    Atop the landing board is the “bottom board” and this one is a screened bottom board, sometimes called an “IPM” or “Integrated Pest Management” board, but I call it a screened bottom board personally. It has a place to slide in a white plastic board for doing mite counts or for covering the screen if you want to make the hive less drafty (e.g., during the blustery wintertime). They also make solid bottom boards which are, as you might guess, solid on the bottom rather than screened. Don’t buy these. The screened bottom board is far superior for a number of reasons, not the least of which is ventilation. The “screen” is actually 1/8″ hardware cloth that is tacked in place and is both more durable than actual screen and also of a size that allows pests like the Varoa mite to fall through and onto the ground. Varoa mites literally suck the life out of your honeybees. You’ll probably have them in your hive – most hives have them – but an infestation of them can kill the hive . We’ll talk more in the future about things you can do to combat Varoa.

    If you look closely at the picture, about two inches back from the front of the bottom board is a small board that sits across the front of the hive. This is an “entrance reducer” and it gives the bees a little help defending the hive. We’ve got it positioned with the smaller hole  in use while if I flipped it around we could use the larger entrance hole. As the hive gets stronger, the larger hole is preferable to the smaller one since it allows less queuing up of bees going in and out of the hive. The entrance reducer could be removed completely too for a strong hive.

    My son is about to place a medium hive body onto the bottom board. It is called a medium based on its height. The length and width of the box is pretty standard but there are a couple of common heights (medium and deep) and a few less common ones. It is called a hive body because it will hold frames where the queen will lay her eggs and where the hive will raise its young. Typically the frames will have some honey and pollen on them but will be mostly filled with brood in some stage of development. You can see in this picture that the frames in the center are covered with bees while the outer ones are not. The outer ones are new frames that were added to the nucleus hive’s five frames to make up the ten frames held in this medium box. Boxes are sized to hold either 8 or 10 frames. The narrower 8-frame boxes are lighter and may be a good choice for those not wishing to pick up so much weight – and the boxes do get heavy. Something to keep in mind.

    Next up, to the left are the pieces which will be added, in order, to the hive. There is another medium filled with new frames, which they will use for brood. We put this on right away though we could have waited a week or so for them to draw out comb on the new frames in the bottom box. I may need to make some frame adjustments during my next hive inspection to encourage them to draw out come on the outer frames. Bees tend to move upward. Life was going to be busy for a couple of weeks after this hive install so I opted to put the second box on right away. We will see how things look when we open up the hive for our next inspection.

    Then, under the medium is an empty deep. I used this out of convenience as a “shim” piece to make space for the baggy feeders. It is really overkill for a baggy feeder (since the baggies aren’t that tall) but it was handy. Later on, it was pulled out and replaced with a medium so I could put it to use in hive #1, which uses deeps rather than mediums for the brood boxes. I’m currently using baggy feeders in one of the hives (baggy feeders are just zip-top bags filled with a 1:1 sugar syrup that have a slit in the side where the bees can access the syrup) and trying an inverted mason jar with some small holes punched in the lid on the other. I’ll probably move away from the baggies as they are a bit messy and are a “one time use” feeder.

    Below the deep is the “inner cover”, which has a large hole in the center of it (not visible in the picture) and a notched opening. Inner covers are used for a number of reasons, but in this hive it is place atop that shim piece and provides an exit point at the top of the hive. I added a second hole in the inner cover and covered the hole with screen to improve ventilation. Ventilation is really important in the hive as it helps the bees regulate the temperature and humidity properly.

    The “telescoping outer cover” is next and it’s job is to top off the hive and keep the weather out. It is “telescoping” because it is a bit bigger than the inner cover and boxes so it can slide forward a bit and expose that opening in the inner cover. It is covered with metal (which I’ve painted to hopefully keep it a little cooler) and as you can see on the upper left part of the picture, I use a  brick on top of it to help keep it in place. If it is really hot (such as it gets here in Virginia in August) I might prop open the top of the hive during the day to help with the heat. More on that in a future post.

    That’s probably enough for this image.

    Enjoy,

    Matt

    Read all of Matt’s Inside the Hive Posts here

    Matt (twitter @MattInTheGarden) thinks, clicks and types for a living. He has an unending backlog of farm chores. He recycles everything he can and has three full compost bins made from free pallets whose contents are in various stages of decomposition. Matt likes strawberry jam and the puzzles of Professor Dennis Shasha.


  • Inside the Hive: Views from a First Year Beekeeper (Scene 3)

    Inside the Hive: Views from a First Year Beekeeper (Scene 3)


    This block of wood that has been drilled out and covered with some screen is called a “queen cage” and holds, as you might suspect, a honeybee queen. There are other styles of queen cages but this is a pretty common one. The process of producing bee packages involves literally shaking worker bees into a screened box approximately the size of a shoebox and then sticking a queen cage in the box. The bees in the box don’t know this queen and might not know each other either. The queen cage is suspended in the package box next to a can of sugar syrup and is held in place by the metal disk that you can see in this picture. Each end of the cage has a hole with a cork in it and one third of the cage is taken up by a piece of candy, something the consistency of a stiff marshmallow.

    Along with the queen bee are some “attendant” bees who have been with her and know her. They keep her company and, like in the hive, attend to her needs. When the package is installed, the queen cage is removed and placed in the hive. There are a number of ways folks do this – some wedge it down between the frames. I stuck mine screen-side down between two frames. The important thing to remember is that the cork on the candy side needs to be removed if the queen is to be released.

    The cage keeps the bees from killing the queen before she has had time to convince them that everything is cool and that she’s the queen of the hive. Remember – these bees were all shaken together into a box and have spent some amont of time traveling to their destination. Things are a bit messed up in their world and, like all honeybees, they thrive in an ordered world and really don’t like it when their world is upended by humans shaking them into some box and shipping them to some far off land. The queen produces pheromones and generally speaking these will convince the workers that things are looking up in their world. Occasionally they will kill the queen anyway, but this isn’t typically the case. It takes some time for the attendants to eat the candy from the inside out and the bees in the hive to eat from the outside in. And, like the Apollo-Soyuz, they do a meet and greet in the middle. By the time this has happened, the queen is accepted and everyone begins to do their jobs – making wax, foraging, laying eggs, etc. Pheromones keep the hive humming along and are one of the ways that the bees communicate with one another.

    Enjoy,

    Matt

    Read all of Matt’s Inside the Hive Posts here

    Matt (twitter @MattInTheGarden) has a head full of questions. He likes the simplicity of the metric system and wishes the USA would just take the plunge and switch over already. He couldn’t care less about what celebrity X is currently up to and can’t understand why anyone would spend money on magazines like People. He favors the crayon color Raw Umber, introduced in 1958 by Crayola.

  • Inside the Hive:  Views from a First Year Beekeeper (Scene 2)

    Inside the Hive: Views from a First Year Beekeeper (Scene 2)


    My second image is a close-up of brood on a frame of wired wax foundation from hive #1. The bees in hive #1 had a lot of work to do as they came from a package brought from Georgia, installed about one month prior to this picture. I had installed a box of ten deep frames in that hive and the bees went through a lot of sugar syrup over the month and drew out a lot of comb on those frames.

    Visible in this picture are a bunch of busy workers tending to this frame of brood. The yellow capped cells have bees in their pupa stage (remember from school the idea of egg-larva-pupa-adult?) and below those capped cells are cells with larva in them of various sizes. Note how large the larva is near the lower left corner of the picture as compared to the larva in the center there. These cells are all “worker” sized cells and will eventually be female workers like the adult ones visible in the picture.

    Enjoy,

    Matt

    Read all of Matt’s Inside the Hive Posts here

    Matt (twitter @MattInTheGarden) is growing Asian cucumbers in his garden this year, tired of the reliable but uninspiring “Straight 8” variety. In a former life he sold computer and game system games in a mall and now can’t stand shopping in malls. He finds the Vicar of Dibley amusing.

  • Inside the Hive:  Views from a First Year Beekeeper (Scene 1)

    Inside the Hive: Views from a First Year Beekeeper (Scene 1)

    As a first year beekeeper, everything is new and exciting and, quite frankly, I find myself yammering on to anyone who will listen about the comings and goings around my bee yard. My intention is to capture images from in and around my hives this year and post them here for others to enjoy. I’m neither a great photographer nor a bee expert so I hope that we can exchange some tips, ideas and knowledge along the way.

    My first image is a close-up of newly drawn comb on a frame of wired wax foundation. This particular frame was installed a week earlier than this photo was taken and that itself is a testament to the industrious nature of the worker bees. All those cells you see in the picture (and those on four other frames) were created in seven days. In a week, the bees created a lot of wax and sculpted it into the comb you see here. Fascinating, huh? Nearly uniform in size and shape, this comb is the result of chemical processes within the bee’s body to convert food (such as honey or sugar water) into wax and then a physical manipulation of that wax.

    I wanted to point out a couple of things from this particular image that I think are noteworthy. First, the orange-brown globs in the cells are pollen. The foraging bees collect this and bring it back to the hive in their “pollen baskets”, which are located on their hind legs.

    Also you’ll notice a variety of  coloration on these bees. These bees are from hive #2, which is from an established nucleus hive I purchased from my beekeeping mentor. Unlike the Italians in hive #1, which were from a package and are of more uniform coloration, the bees in this hive are bright orange, and yellow and grayish and dull yellow. The queen has mated with a number of drones and since they all have slightly different “bits” flipped in their DNA and pass a bit of that along, you get variation, which is a very good thing. I like my “mutt” bees in hive #2 and think it is interesting to examine the slight differences among them.

    Enjoy,

    Matt

    Read all of Matt’s Inside the Hive Posts here

    Matt (twitter @MattInTheGarden) slings code by day and plays the role of handyman on his family’s hobby farm in Virginia. He makes his own Greek yogurt and enjoys time with his family. He is horrifically bad at the banjo, a mediocre juggler and can make a pretty good omelet. His black lab mix thinks he’s pretty nifty too.

  • Bee Swarm Capture Video – GF Video

    Bee Swarm Capture Video – GF Video

    Honey bee swarm capture, or bees swarm rescue, or hiving a swarm caught on video. Capturing a honeybee swarm is a neat experience. Bees swarm in the spring, and then they move to a tree limb to start looking for a new home. This is when we can capture the swarm.

    This honeybee swarm was in Carroll Gardens Brooklyn, where there are a lot of urban beekeepers. In the spring the honeybees swarm, half of the bees leave the hive with the queen to form a new colony in a hollow tree, ideally. The swarm bees will cluster on a tree limb while their scouts fly out and look for a new home.

    Beekeepers can take advantage of this cluster to create a new beehive. The bees are very docile while they are swarming, they have no hive to defend, so they are not out to sting you.
    Luckily, these bees here on a low hanging limb that i was able to get to with a ladder. You take a bucket, place it below the swarm, and thump the branch on the bucket so the bees drop into the bucket.

    bee-swarm-capture-gf-video

    Next time i should have a helmet cam on, it was a very cool thing to watch. This video shows the view from down on the ground. It was neat, to say the least. What is key here is I had an empty hive on standby for a swarm call like this.

    You can also drop the bees into a cardboard box that has large vent holes covered with screening. The bees NEED lots of air or they will overheat.

    We leave the swarm box on the ground for several hours to let all the bees fly into the box, ideally you will move the box in the evening, when its cooler and the bees are calmer.

    Check out some nice photos of a swarm capture by Phillipe here.

    In Brooklyn, honeybee swarms have become a regular occurrence, and people will walk right by without even looking sometimes. Check out all of our how to raise honeybee videos here

  • Drone Laying Worker in a Queenless Hive

    Drone Laying Worker in a Queenless Hive

    When we check our honeybee hives, we first just stand there and observe them. We could tell there was something wrong with one of the hives.

    note the large drone cells scattered about

    It was quiet, the hive next to it was buzzing with activity.

    We opened it up to hear this odd low frequency hum in the hive, not something you usually hear. One look at a brood frame told us we had a bad problem on our hands.

    The queen was dead.

    And to make matters worse, one or more workers had started laying eggs in the cells, and since workers are infertile, all the eggs are drones.

    Queenless hive, signs of the drone laying worker here


    So how can a worker bee lay eggs? If  a hive is queenless, her pheromone is absent, and a few of the workers can then begin lay eggs. It doesn’t happen everytime a hive loses  queen, and this is the first time it has happened to us.

    You can’t just put  new queen in one of these hives, as the laying workers will kill the new queen. You have two choices, either combine the queenless hive with a healthy hive nearby, or get rid of the laying workers.

    One of our Facebook fans explained how she did this:

    Rhonda wrote: “Not good. I had this happen last year. I took the hive that had some young bees and some older bees in it and moved at about 2000′ away from the original location, dumped all the bees out onto the ground-every one of them, then took the hive body back to the original location. The younger, drone layers had not been out of the hive yet, so they could not find their way back home. I then transferred a queen cell from another hive into that hive and before long everything was good again. I know, it as a bit chancy, but the other options weren’t much better.”

    Healthy frame of brood, note the curled up larvae.

    The laying workers are nurse bees who have yet to leave the hive, so they have don’t know any outdoor landmarks or orientation to return to the hive. The older bees, who are foragers, know the location of the hive, so when dumped out of the hive, they will fly back to its location.

    This hive was pretty weak, so I’m thinking right now i’ll combine it with the stronger hive next to it, and perhaps split the strong hive in  week or two, with a new queen in the split. * we did the beehive combine, click here to see how to combine beehives

    Have you dealt with a drone laying worker? Let us know below

  • Tornado Safe Rooms, Tornadoes, & Storm Chasers GF Radio

    Tornado Safe Rooms, Tornadoes, & Storm Chasers GF Radio

    Tyler joins us to talk about building tornado safe room or tornado shelter, his sister built a tornado safe room in the floor of her garage, and safe rooms were discussed at ChaserCon. Safe rooms can be pre-fab or built on site out of concrete or steel or a combination of rebar, cement, and cinderblocks. Storm Chasing comes next, is storm chasing really like how it looks on the cable shows? Tyler talks about what its like to chase storms and the science behind what causes tornadoes, how to tornadoes form?

    Car repair comes next, Tyler is having some car repair issues with his Jeep, we talk about what a crankshaft is, a harmonic balancer, and flywheel do.

    We talk about beekeeping and Tyler’s beginning beekeeping experiences, Eric and Tyler agree that using medium supers, not the large deeps, are the best way to keep bees. Siting your bees is an issue, as you have to keep in mind how you are going to get to your honeybees in winter and summer, you can’t always just drive your truck right up to them, think about where they are going to live.

    If you want to listen to our Beekeeping for Beginners Questions & Answers shows, click here.

    Car and Truck safety on the highway rounds out the show, a viewer mail asks out loud what will driving be like in 20 years?

    photo by cohdra

  • Beekeeping for Beginners FAQ Part 2 : GF Radio

    Beekeeping for Beginners FAQ Part 2 : GF Radio

    Matt joins Eric to answer Beekeeping for Beginners questions on this show. What equipment to buy, how to buy honeybees, where to put beehives in your yard, what kind of beekeeping suit to buy all answered here.

    what kind of beekeeping suit and beekeeping veil is good?

    what kind of frames should i use in the beehive, are plastic frames better than wood frames?

    wax foundation versus plastic foundation should i use plastic or wax foundation on the frames of the beehive? eric talks about the benefits of wax foundation and plastic foundation and frames

    Eric suggests 2  beekeeping for beginners books,


    Buy On IndieBound Here

    Click Here to buy on Amazon


    Click Here to Buy On Indiebound

    Click Here To Buy On Amazon

    Beekeeping for Dummies and the Backyard Beekeeper

    do you paint the outside of the beehive? yes, we use latex paint.

    should i buy 8 frame supers or 10 frame supers? matt and eric talk about the benefits of 8 frame boxes and 10 frame boxes

    what kind of beekeeping tools should i buy? eric suggests bringing duct tape, scissors, entrance reducer, smoker, woodchips, matches, 2 or 3 hive tools, a frame grabbing tool, needle nose pliers and more.

    what kind of hive stand should my beehive rest on? cinder block, wood, metal stands are talked about, eric suggests having a work table next to your hives.

    we talk about benefits of top bar hives vs. langstroth hives, and the drawbacks of top bar hives and langstroth beehives.

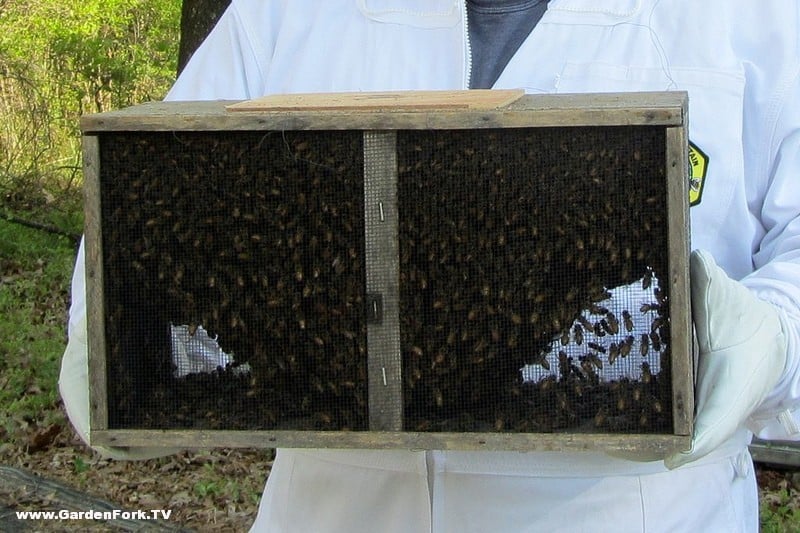
    should you buy a bee package or a honeybee nuc? eric talks about the advantages of honeybee packages , the pros and cons of bee packages, and the benefits of being a nuc or nucleus hive to start a beehive.

    eric advocates buying local honeybees and queens, either packages or nucs, the closer you can buy your bees the better.

    www.whiteoakapiary.com in Brewster, NY and www.warmcolorsapiary.com in Greenfield, MA is where eric buys queens and honeybees.

    should you feed honeybees in winter and how do i feed my bees over the winter? eric talks about how to feed bees in winter. you can watch our Beekeeping for Beginners video series here, and several videos are about feeding bees in winter.

    Eric uses a hand immersion blender to mix this sugar feed solution, and adds this homemade essential oil recipe for bees to the sugar

    The essential oil mixture is great for spraying the bees to combat nosema and bee diarrhea.

    winterizing beehives is discussed, here is eric’s beehive insulated inner cover video, Eric feeds sugar cakes to the bees in winter, not fondant or sugar syrup. Should you close or open a screened bottom board? Matt and Eric discuss

    Mudsongs.org is a favorite beekeeping blog of eric’s. Phillip documents his beekeeping in Newfoundland Canada.

    where to site your hives in your yard, where should you put the hives, what is the best location for beehives? eric has learned that full sun is best, he talks more about it during this radio episode.

    should I take a beekeeping class? eric says yes.

    and join your local beekeeping group. search on the web for your state’s beekeeping association, and that site should list local beekeeping groups.

    Megan of BrooklynHomesteader.com offers online beekeeping classes, and in-person classes as well.

  • Venting Your Crawlspace & ifixing your iMac – GF Radio

    Venting Your Crawlspace & ifixing your iMac – GF Radio

    Today on GardenFork Radio, Rick decides iFixit.com should sponsor GardenFork.TV and GF Radio, after Eric tells of how he has used the iFixit.com site and the products they sell to repair his iPhone and replace the hard drive on his iMac . Getting that damp smell out of your crawl space or basement also takes up a lot of this week’s show with Rick. How to use fans to vent your basement, do dehumidifiers work? What’s a vapor barrier? Rick asks what is the right thing to do when trying to vent your crawl space and get rid of the humidity.

    How do they figure out where the break is in a sewer line? Rick and Eric are amazed by the technology used to find leaks in sewer and water lines. Rick had a new line installed into his yard, and they used what is called a Pig to ram the pipe through the yard.

    Rick tells how to make a hot bed in a cold frame using manure, and where the term ‘hot bed of political activity’ comes from.

    We then move on to Bees and Beekeeping, Rick tells of  how to requeen a beehive with a new queen, and his travails in actually trying to requeen a hive with a new queen he purchased from White Oak Apiary . Key to requeening  a hive is to have help doing it, eric thinks. then its Viewer Mail, YouTube comments and more.

    photo by manimorff

  • Bait Hives, Bee Swarms and Swarm Traps, Beekeeping 101 : GardenFork.TV

    Bait Hives, Bee Swarms and Swarm Traps, Beekeeping 101 : GardenFork.TV

    I built some honey bee swarm traps, or bait hives, to try to capture any bee swarms that came out of the beehives in our beeyard. Swarm Traps, or Bait Hives are basically boxes you place around near your bees, offering them as convenient homes for new bee swarms. The bait hives – swarm traps I show you how to build  here are made from old bee frames and boxes. When my neighbor called me to say there were bees flying around one of our Swarm Traps, I left work and drove over, excited to video our first swarm! And happy too that we had not lost swarm to the woods, instead we could start a new hive with it, or recombine it with the hive from where it left later in the fall. Here is the video we made for our Beekeeping 101 Beginning Beekeeping

  • Water your honeybees

    Water your honeybees

    We just shot another of our Beginning Beekeeping aka Beekeeping 101 videos and I wanted to show you how we water the bees. One of our two beeyards is near a vernal pond, and a stream not far away, but I’m all about making it easy for the bees, so I put out some water buckets for them. Bees don’t swim, so put some wood in the bucket for the honeybees to stand on while taking up the water

    watering bucket for honeybees


    i've placed the water outside the bearproofing electric fence
  • New beehives in our second beeyard, bearproofing the beehives

    New beehives in our second beeyard, bearproofing the beehives

    We have a real bear problem in our town with bears, and bears really like to tear apart beehives. So to hedge our bets, we decided last year to start a second beeyard in another part of town. Our second beeyard is near the center of town, right next to the cemetery. The honeybees and their hives are on the edge of a large hayfield, where they are protected by the prevailing winds and get excellent daylight throughout the day.

    We hived two new packages,  using medium supers on these hives. I put our hives on small tables. The height of the table makes it much easier to work the hives, and we can grease the legs of the tables to keep carpenter ants and other insects from entering the hives.

    We use a few techniques to bear proof our beehives. First we have a solar powered electric fence made by Premier 1 Supplies. Premier 1 gave us the electric fence they sell to protect beehives from bears. So far it has worked. Its also very easy to set up and move. You can watch our how to bearproof beehives video here.

    Second we use a ratcheting strap to strap together the beehives. The thinking here is that if a bear does get to the hives, the straps may keep the hives together despite the bear trying to take the hive apart. I’ve read where this has worked for a few people, so it doesn’t hurt, I don’t think. We may need a heavier ratchet strap, the kind used on semi trucks.

    Newly hived bees
    Solar powered fence from Premiere 1 Supplies
    I like the rectangular net pattern of this electric fence.
    wide view of the hayfield where the beeyard is


  • Honeybee sugar syrup: why use only cane sugar?

    Honeybee sugar syrup: why use only cane sugar?

    I’ve heard from more than one person, be them beekeepers or just people who think they know something about honeybees and beekeeping, that you should only use cane sugar to feed your bees sugar syrup in the spring or fall.

    sugar and cane sugar

    I haven’t read this in any of my beginning beekeeping books, nor was it mentioned in my beekeeping class.

    White table sugar, which is what we use to feed our honeybees in the fall and spring, is made primarily from sugarcane or sugar beets

    I looked at sugar packages at the grocery stores in my town, I noticed one brand did say cane sugar on the package.

    So, why do some say feed your bees only cane sugar?

    It may be that sugarcane has not been genetically modified (yet). But there are GMO sugar beets:

    “Genetically modified (GMO) sugar beets are already planted on more than one million acres of farmland, spanning 10 different states from Michigan to Oregon. In fact, the Roundup-resistant gene is present in 95-percent of U.S.-grown sugar beet plants.” Treehugger Federal Judge Bans Genetically Modified Sugar Beets

    So it seems prudent not to feed your bees GMO sugar if you can. Yet GMO sugarcane is on the horizon:

    Commercial utilisation of GM sugar cane is possible in the near future in the USA and Brazil. GMO-Compass

    Now my head starts spinning. All we want to do is feed our bees some sugar to get them thru the winter and early spring, and we have to contend with global GMO issues.

    What do we do? Let us know your thoughts below:

  • Bear Proofing Your Beeyard : Beginning Beekeeping Video

    Bear Proofing Your Beeyard : Beginning Beekeeping Video

    In this video on bear proofing your bee hive, we talk about ways to keep bears away from you beehives. The largest danger to our beehives are bears. They are very common here in NW CT and we don’t want them wrecking our beehives.

    We read an article on bear proofing one’s hives in Bee Culture link here, by Ross Conrad, author of Natural Beekeeping, and have used a few of the bear proofing methods he wrote about for our hives.

    We are in our sophmore year of beekeeping, and don’t purport to be experts on beekeeping yet, but we wanted to document our first years of beekeeping and share them with you all.

    We have used this and other electric fences to bear proof the beeyard with good results. Your results may vary. Be very careful when dealing with bears. If there is one in your yard, get in the house, and get your dogs in the house too.

    Full disclosure, Premier 1 supplies sent us the electric fence for free. I think its a good product.

    Beekeepers: what methods do you use to safeguard your hives? let us know below