Author: Eric

  • Worm Composter Tips from Rick : GF Radio

    Worm Composter Tips from Rick : GF Radio

    Rick and Eric talk about vermicomposting, or Worm Composting, and how to prepare the food scraps you are adding to the worm composter.

    Worm-Composter-TipsGetting your bees ready for spring is talked about. Eric adds pollen patties in the spring to his hives, and he found two dead hives when he did a late winter bee inspection. Rick says sometimes honeybees to strange things. Several of Rick’s hives starved out. Rick reminds everyone when you are feeding honeybees sugar syrup in the late winter, put the sugar syrup at the top of the hive, not in a glass jar feeder in the front lower entrance. the bees will never find it.

    Rick uses a plastic zipper style bag with sugar syrup, he lays the bag of syrup across the top frames of the hive and cuts a few slits across the top of the bag so the sugar syrup will ooze out.

    BeeInformed.org is a website to collect data on crashed hives in an effort to find out how many hives have crashed.

    Eric talks about his recent lunch at Than Da and eats a Banh Mi Sandwich. he made a video about his visit to Sunset Park, Brooklyn to Brooklyn’s chinatown.

    Rick tells us about Adam Savage’s site, Tested.com, about stuff he does, nice videos.

    Eric talks about making an ikea hack dream of a folding work table.

    Eric and Rick both want to de-clutter, but lament that they both need a lot of stuff to do the projects they do, like beekeeping, or beer brewing, maple syrup making. All these projects require you won stuff.

    We read an email from Mike about the many failures that happen when getting to the solution.

    Progress has been made on our arduino controlled beehive monitor. We got two emails about this which we read on the show. worm photo from morguefile.com

  • Repair Of Our Hoop House Cold Frame : GF Video

    Repair Of Our Hoop House Cold Frame : GF Video

    Setting up our simple cheap hoop house greenhouse for seed starting. This PVC hoop house cold frame works well for us and it was easy to build, here is the video of us building our the hoop house. The hoop house greenhouse allows you to get a head start on planting vegetables and seed starting. We started this in February to start warming the soil. This can be made for free if you find some scrap leftover lumber and PVC pipe. This plan uses short lengths of PVC pipe, which you may find laying around your yard, or your neighbor’s yard.

    My hoop house plans for this mini greenhouse are simple. Some 2x4s, some PVC pipe, and a piece of plywood. The thermal actuated vent keeps the hoop house from overheating. Link to buy the thermal greenhouse vents

    I use 3 mil clear plastic from the hardware store, it lasts a few years with care. I hang our mini greenhouse on the back of a shed when i am not using it. To attach the plastic to it, I fold the plastic over on itself and use lots of staples. You could also use a piece of lath or thin wood to hold the plastic to the wood. For the ends, I staple the plastic to the plywood end with the thermal vent and then cut off the excess plastic. For the other end of the cold frame hoop house, I simply bunch up the plastic and staple it to the 2×4.

    Cheap-Hoop-House-Greenhouse-Setup-2

    After a few days on your vegetable bed, this portable greenhouse will start warming the soil. Its amazing how warm it is inside the hoop house compared to the outside temperature. We have a video showing how a hoop house greenhouse can defrost your garden soil coming soon.

    In the video, the plywood I used for the end of the greenhouse, OSB, is not the best kind of plywood for outdoor uses. Use a better piece of plywood and paint it with a few coats of latex paint, it will last much longer if its painted.

    hoop-house-cold-frame-play

    Click here to watch our How To Build a Hoop House Cold Frame Video

    How-to-build-a-cold-frame-hoop-house-3

    Click here to watch How to build a cold frame video.

    Learn how to grow food year round, read Eliot Coleman’s Four Season Harvest book and Nikki Jabour’s Year Round Vegetable Gardener.

    Do you use a hoop house greenhouse? let us know comments or questions below:

  • Winter Bee Inspection & Dead Bees – Beekeeping 101 Video

    Winter Bee Inspection & Dead Bees – Beekeeping 101 Video

    Another of our Beekeeping 101 videos on how to do a winter bee inspection. Links to more beekeeping videos at end of the post. This time we open up the beehives in late March to show us feeding bees in winter. Keeping bees in areas with snow and winter, you will want to add sugar cakes, aka fondant, in the winter, and then add protein patties in late winter – early spring to get the honeybees going early.

    You can open a beehive if its above 40F to do a quick winter bee inspection, if its in the 30sF, you can open it real quick to put some sugar on the top of the hive. Do not take the hive apart for a full inspection. We are just taking off the outer and inner cover, and looking in from the top of the hive real quick. The faster you do this the better, I think.

    winter beek check list watchHoneybees may not always crawl up to the top and show themselves, they may still be clustered in a lower super, so just leave them that way. If you come across a dead hive, as we did, my suggestion is to leave the hive be, tape up the entrances, and clean out the hive when it warms up. You tape the entrances closed to keep the wax moths from moving in as spring approaches.

    Dead Bees near sugar cake
    Dead Bees near sugar cake

    Why did my bees die? Its not always obvious. Condensation is a big winter killer, but since we switched to the insulated inner covers we built, click for the insulated inner cover post, we have not had a condensation problem in the beehives in winter. Every year we have had a beehive die in winter, it is hard to get them all through winter. So when a hive dies, don’t blame yourself if you have done the following:

    • Followed a plan for varroa mite control
    • Fed bees in fall with sugar syrup
    • Left enough honey in the hive for winter
    • Added sugar cakes or fondant
    • Used an insulated inner cover
    • Tilted the hives forward in fall

    Read more of our beekeeping posts here and watch beekeeping videos here. Thx!

    beekeeping-sugarcake-vid-thumb

    Questions, comments? please let us know below:

  • Hernias and Evernote : GF Radio

    Hernias and Evernote : GF Radio

    evernoteEric and Rick talk about Sarah’s talk about how to start a catering business on the previous GF Radio show and Rick’s laproscopic hernia surgery. The success of the GardenFork email with Henry’s photo in it yielded a bunch of pet photos.

    Eric talks about how he uses Evernote via email to save Viewer Mail for the show, and Rick likes Evernote too.

  • Maple Sap Collection Tips, Backyard Maple Syrup Project GF Video

    Maple Sap Collection Tips, Backyard Maple Syrup Project GF Video

    Halfway through collecting maple sap to make maple syrup, I made this video on tips on tapping maple trees and how to collect sap to make maple syrup. Shot on the iPhone, it looks pretty good.

    I use tree saver plastic taps and plastic lines to collect sap, i’m finding that buckets at each tree work pretty well. I have one large barrel that collects from two trees, and its kind of a pain to get the sap out. The benefit is if the sugar maple sap runs really well, the bucket can handle the sap. One time my smaller 5 gal buckets overflowed.

    There has been some discussion on how much sugar gets trapped in the ice that we remove from the sap buckets. My neighbors, old time maple syrup experts, remove the ice from their maple sap buckets. But then I was asked how much sugar is lost with the ice, and I don’t know. The questioner brought up Popsicles, and the fact that they are made with sugar that seems to freeze with the ice.

    maple-syrup-update

    It helps when hauling buckets of sap to have them only half full, its easier on your back and you splash a lot less. I store our sap in a big new trash can on the shady side of the house that has been surrounded with snow to keep the sap cool.

    Check out all of our how to make maple syrup videos here

    Here is a great PDF from the Univ of Maine on how to tap trees and boil sap

    Let us know  your questions or comments below:

  • How to start catering : GF Radio

    How to start catering : GF Radio

    Sarah joins Eric to talk about how to start a catering business. Sarah has been catering birthday parties and dinners on the weekend, and tells us what its like to do catering, how to get started catering and personal chef business, and what issues she has dealt with in the catering business. The key is that it is a business that Sarah enjoys, as she loves cooking and baking. This is a big thing when starting a business, you have to love what you do. The challenge for her is to make it profitable.

    Eric brings up that despite being a mother to a 1 year old, Sarah has been able to do quite a bit, and Sarah talks about how having a child has motivated her to make her future what she wants it to be.

    Her first catering job was via a community Yahoo group, Sunset Park Parents, and word of mouth has helped  her grow her business.

    Neighborhood websites are a great place to spread the word about your new business.

    meatballsSpeaking of email groups and community websites, Sarah talks about creating a Yahoo group for parents with kids born in 2012 in her neighborhood.

    Nextdoor.com is a website that has neighborhood communities, and verifies people’s names when they are joining. One could also use Ning.com to start a community group. Or you can just create a Yahoo or Google group, which is super simple.

    We also talk about Sarah’s simple meatball recipe that she posted on HelloBee.com, a pregnancy and parenting website. Sarah is their food contributor.

    Sarah’s recipe is inspired by her reading of a book, Long Way On A Little, by Shannon Hayes, Buy Long Way on a Little here
    which will be reviewed on GardenFork soon.

    photo by kconnors

  • DIY tapping maple trees for maple syrup – GF Video

    DIY tapping maple trees for maple syrup – GF Video

    Tapping sugar maple trees to make maple syrup is a big tradition in my part of Connecticut, so I wanted to show you how to tap maple trees to get maple sap to make maple syrup. We use plastic taps and tubing that are connected to buckets at the base of each tree. The advantage of using individual buckets is that some of the water in the sap will freeze in the collection bucket. The whole goal of boiling sap in an evaporator is to remove the water from the maple sap, so removing some of the water as ice is a super simple way to reduce your boiling time.

    Tubing Connector for tapping sugar maples
    Tubing Connector for tapping sugar maples

    We buy our taps and tubing from Leader Evaporator. The smallest length the tubing comes in is 500′, but don’t fret, its quite inexpensive, about $60 for that much tubing. To buy a lesser amount of tubing locally would cost just as much. We use Tree Saver taps. Buy a bunch of their tubing connectors too, you will need them to tie several taps into one bucket.

    In a future sugar maple tree tap video, we’ll connect several trees into one large collection barrel.

    Check your buckets every morning, scoop out the ice with a sieve, and then store the sap in a large barrel that is in a cold place packed with snow. The sap has to stay cold or it will spoil. You can tell if you sap has gone bad if it has a milky color to it.

    We have a bunch of maple syrup making videos, including how to boil down your sap into maple syrup, click here to watch our maple syrup videos

    Here is a great PDF from the Univ of Maine on how to tap trees and boil sap

    Have any questions or comments? Please post them below:

  • The Monica Show! GF Radio

    The Monica Show! GF Radio

    spongePreviously known as the food safety show, this time with the correct audio file! Monica joins us to talk about food safety and being smart about food. Cleanliness is key here.

  • Install a Washing Machine : GF Video

    Install a Washing Machine : GF Video

    Learn how to install a washing machine in this GardenFork how to video. Eric shows how to remove your old washer machine, and how to put in the new clothes washer. The washing machine used in this video is a front loading clothes washer, but the install process is the same for a top loading clothes washer.


    The plumbing on a washing machine is pretty simple, you have the water supply lines and a drain line. The water supply lines are just like garden hose connections. I suggest you buy new water supply hoses with your new washing machine. Some new washers include the hoses in the box, check before buying new ones. Check the washer drain line to see if it needs to be replaced. If it is cracked or stiff, its time for a new one. Again, a new drain hose may be included in the washer box.

    Two important things when installing a new washing machine:

    • be sure to plug the washer into a GFCI outlet. That’s the kind that is used in bathrooms and laundry rooms.

    • make sure the washing machine is level. If its not level, it will vibrate across the room.

    After hooking up the new water lines and drain line, plug in the washing machine and set it to do a rinse and spin cycle, not a complete wash. This will test if the machine is level, as the spin cycle is when the clothes drum is spinning the fastest. If the washing machine starts to vibrate, turn it off and check the levelness of the washer. Adjust the feet of the washer and then lock off the feet, each foot has a lock nut.

    Install-a-Washing-Machine-2

    After using the washer, keep the door or lid open to allow the clothes drum to dry out. If you don’t do this, mold can start to grow in the washer. Many new front loading machines have a lint filter, its important to clean this out.

    I’ve also found out the hard way to remove all the coins from your pocket, the coins can get caught in the water pump.

    Here is a how to video we did on replacing the water pump on a washing machine.

    Have you put in a washing machine? let us know your thoughts and suggestions below:

  • Dog Treat Recipe Success!

    Dog Treat Recipe Success!

    Katja watched our Sweet Potato Dog Treat Recipe video and made these great looking dog treats!

    dog-treat-recipe-katja

    In an email, she says:

    I made your Sweet Potato dog biscuit recipe today. My slightly picky Labrador pup –I know a contradiction in terms- loves them.
    Really liked the dogbone cookiecutter you used and looked online for one. I didn’t find a large one but it will do fine for a small treat.
    They also had a couple of dog breed cookiecutters and I got the Labrador one.
    It’s kinda fussy with the sticky sweet potato dough but they came out ok.

    I know some Labradors that are picky about their dog treats – Henry wont eat carrots, and of course, Charlie Pup inhales them.

    The dog treat dough for this recipe is kinda sticky, I think the sweet potato makes it that way, its also full of potato strand like stuff, so that adds to it. But with a good cookie cutter, or just a tin can, you can cut out the dog treats.

    I really like the Labrador cookie cutter Katja used here. You can find some cookie cutters online here.

    We have a few dog biscuit recipes, click  here to watch them all

    Have a dog treat recipe? please share it or your treat ideas below in the comments, thx!


  • Burning Sponges, Clean Food : GF Radio

    Rick and Eric talk about clean food in the kitchen, dog allergies, and modernist cuisine.

  • Dog Treat Recipe Sweet Potato Dog Biscuits GF Video

    Dog Treat Recipe Sweet Potato Dog Biscuits GF Video

    Homemade Dog Treat Recipe! These dog treats are easy to make, and our dogs love these dog biscuits. I’m wondering if there’s a difference between dog treats and dog biscuits, maybe dog treats is a more general term and dog biscuits refer to baked dog treats like these sweet potato dog treats we made for the Labradors.

    While working on this recipe, I found the amount of milk you add varies depending on how large and how moist the sweet potato is. You want the dough to be kinda dry, like pie crust dough, not wet. I’ve reduced the amount of milk in the dog treat recipe here, after mixing in the dry ingredients, you can add more milk or water if the dough is too dry to work with a rolling pin.

    dog-treat-recipe-sweet-potato-dog-biscuits-2

    You also might consider adding in brewer’s yeast or powdered garlic to these dog treats, if you’ve found those ingredients help your dog’s health, or flax seed perhaps? What do you think?

    I add flax seed oil to our Labrador’s breakfast to supplement their omega 3,6,9 intake. Keep flax seed oil in the fridge, btw. If you want to buy flax seed oil, its usually kept in the fridge case of the health food store.

    If you don’t  have a dog biscuit cookie cutter, you can use a glass or tuna can to cut out round dog treats, but its fun for kids to make dog bone style treats.

    Here are some dog treat cookbooks you might want to check out, and let us know your dog treat recipes below:


    Sweet Potato Dog Treat Recipe : GardenFork.TV
    Ingredients
    •    1 Medium sweet potato
    •    2 cups whole wheat flour
    •    1 cup whole oats
    •    2 eggs
    •    3/4 cup milk
    Cooking Directions
    1. preheat oven to 350F
    2. poke 4-5 fork holes into sweet potato, microwave for about 8 minutes, or use the \”bake potato\” setting on your microwave. let the potato cool before handling it!
    3. mix the two eggs together in a small bowl, set aside
    4. remove the sweet potato from the skin and mash with a fork
    5. add the dry ingredients together with the mashed sweet potato
    6. add in then eggs and milk. you want a thick dough that isn\’t sticky, you may have to adjust the amount of milk.
    7. flour a board and roll out the dough, you don\’t want a sticky dough
    8. roll out to 1/2\” or 1/4\”
    9. cut out dog treats with cookie cutters or a glass or a tuna can or just use a knife to cut out whatever shape you like.
    10. grease a sheet pan with cooking spray, butter etc. put the dog treats on the pan
    11. pick up the leftover rolled out dough and form it into a ball again, and roll it out into a sheet, and cut more dog biscuits
    12. bake for 30 minutes or until slightly browned on top.

  • Replace Sink Strainer Gasket DIY Plumbing

    Replace Sink Strainer Gasket DIY Plumbing

    Sink leaking? I bet the gasket in the sink strainer is leaking. This is a DIY plumbing repair I did at a friend’s restaurant, but the concept is the same. But if you need to fix your leaking chef kitchen sink, this is how to repair a leaking sink.

    Use a screwdriver and hammer to unscrew the ring
    Using a screwdriver and hammer to unscrew the ring in a commercial sink

    For this sink, which is a bit more industrial than your average sink, you remove the top ring from inside the sink. For most household sinks, there is a ring with tabs on it that attaches the sink strainer to the sink itself. For either type, you can buy a fancy tool to remove the ring, or you can use my favorite tools, a hammer and a screwdriver.

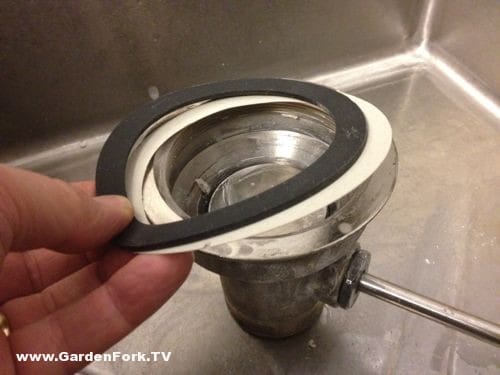
    Rubber gasket, cardboard ring and sink basket assembly - restaurant sink
    Rubber gasket, cardboard ring and sink basket assembly – restaurant sink

    First remove the pipe that is connected to the strainer – this is called a tailpipe, btw. Tap on the tabs under the sink to move the ring counterclockwise. You might have to jam a screwdriver into the basket from the top to keep it from spinning. If you break the tabs, its ok, you can go buy a new sink stainer for cheap, and its shiny clean too.

    Home kitchen sink
    Home kitchen sink

    Remove the the strainer, and clean it and the sink surfaces. There may be old plumber’s putty around the hole in the sink. Pick up a new gasket at your local hardware store, it will be a rubber gasket that also comes with a cardboard ring. If you are using the old sink strainer and there was plumber’s putty on it or the inside part of the hole in the sink, roll out a long hot dog of plumber’s putty about 1/4′ in diamter, and wrap this around the sink strainer and place the sink strainer back in the hole. Press down on strainer to squish out excess putty.

    Gasket replaced, no leaks! ( how unusual for Eric... )
    Gasket replaced, no leaks! ( how unusual for Eric… )

    From underneath, place the rubber gasket onto the strainer, then the cardboard ring, then screw on the metal or plastic ring. For this restaurant kitchen sink, its a little backwards, but you get the idea. Screw the ring on tight, but don’t break the ring getting it tight.

    Re-attach the tailpipe – the piece of pipe that connects the sink to the drain pipes- and fill the sink with water, and check for leaks. If it leaks, you may be able to just tighten up the ring a bit, if that doesn’t work, it may be that the sink hole is warped or has some crud in it that is not letting the gasket seal tight. You’ll have to take it apart, clean up the hole, and re-assemble.

    Have you done some DIY plumbing repair? Let us know below:

  • Meteors, Online Book Clubs, & Home Prepardness : GF Radio

    Meteors, Online Book Clubs, & Home Prepardness : GF Radio

    rockRick and Eric talk about the recent meteor landing in Siberia, dashboard cameras, book clubs online, home prepardness, and some beekeeping. Plus whatever else we happen to talk about.


    photo from MorgueFile

  • Cheap Grow Light Stand : GF Video

    Cheap Grow Light Stand : GF Video

    Easy grow light stand made from scrap lumber! Don’t buy one of those $100 grow lights, build this grow light stand to go with our DIY grow light video. Homemade grow lights have always been funky, but with this grow light stand, and our easy grow lights built from cheap shop lights, you won’t have to have this mess of lights and cords and rope to hang grow lights above your plant seedlings.

    I built this light stand out of scrap lumber I had in the garage, if you don’t have any, ask your neighbors or walk around the neighborhood on trash day, I bet you’ll find free wood to build this. You’ll need some chain as well, which you can get from the local hardware store.

    grow light video insert

    What I like about this grow light rig is that you don’t have to hang lights from the ceiling or some kludged together mess of ropes and wood. The side braces allow the light to be adjusted up as the seedlings start to grow. I’ve also got an idea for a stacked version of the grow light stand, so you can put one on top of the other and save space. neat.

    cheap grow light stand

    What kind of bulbs should you use in grow lights? I use regular old warm white or cool white fluorescent bulbs. Other may disagree with this, but here’s my thinking, we’re not growing plants, we’re starting seedlings, and the light output of these inexpensive lights works fine for me. Its been suggested not to mix the kinds of bulbs you use in a grow light made from shop lights, it can make the ballast wear out faster.

    cheap grow light stand

    cheap grow light stand

    cheap grow light stand

    Check out our special Seed Starting How To page here.

    What are your ideas for grow lights? let us know below:

  • Catching Up With Rick GF Radio

    seed_startingRick joins Eric to catch up and talk seed starting! If you are listening on iTunes, please leave us a review, we appreciate it. Eric just weathered the snowstorm named something which Rick doesn’t know about. Rick took a quick trip to Florida. Eric rebuilt his cold frame hoop house to start salad greens, but learned recently that while salad greens are considered cool weather crops, the seed prefers a warmer temp to germinate. Seed germination mats is talked about and one should not use a regular heating pad to try to warm your seed trays to speed germination. regular heating pads are too hot. When is the best time to start seeds and why Eric does not like to use a window sill to start seeds. Eric’s how to build a grow light video is talked about, and how one should not mix up the color temperatures in each fixture of the simple grow light.

    Building plastic greenhouses, how to use PVC pipe for greenhouses, and why you might consider UV stable plastic when making a hoop house or cold frame. Rick tells us some of  his experiences in the plastic greenhouse he has his hydryponics system in, and how the raccoons have ruined a lot of his project.

    Rick is going to try tomato grafting, he has ordered tomato root stock and is on the way , he will update us as  he goes along.


    photo by blackbird

  • Paper Seed Pots – great photo!

    Paper Seed Pots – great photo!

    GardenFork viewer Rich sent us this photo of the paper seed pots he made after watching our  how to make paper seed pots video. He’s got a ton of them here. Great to see people making cool stuff for starting seeds! thanks to Rich for sending this.

    paper pots by Rich