Daniel watched our Brick Pizza Oven Plans video and built his own. He calls it a Wood Fired Oven, aka wood fired pizza oven.
He tell us a bit about it:
I have constructed a dry stacked wood oven similar to [GardenFork’s} I purchased the cement blocks for the base and the cement board for the sub floor at home depot. After leveling the land, I created a surface onto which I placed the fire brick floor of the oven. These were also newly purchased. From there I built up the oven itself from used clay bricks. The roof is supported by angle iron pieces. I constructed a short chimney from bricks.
My first pizzas were not at all perfect but there is still a lot to learn about maximizing this oven and of course, being that it is kind of rough, to say the least, it may never be able to match the results of a commercially produced wood fired oven. But for those who want to experience a wood fired oven without the commitment of dollars or creating a permanent structure, this might be the way to go. So far, I love it! Dan
I love how Daniel took the brick pizza oven plan we did, and made it his own. The cement blocks make a great base, its clear that pizza oven isn’t going anywhere. He also doubled up the brick walls and roof, so the oven would have more mass and hold more heat. If you have more brick, use it, I say.
Daniel originally posted these photos on http://www.pizzamaking.com/, neat forum if you are into pizza making big time.
Hey everyone! I haven’t posted in a while but wanted to wish you all an early happy Valentine’s Day and share a recipe for a healthy treat. I wanted to make my 11-month-old something special for the holiday that wasn’t loaded with sugar or white flour and decided to try my hand at homemade jello. It’s really simple and fast to make, plus it’s fun to eat.
Homemade jello doesn’t take any longer to make than the boxed mix and comes together without any food colorings, artificial flavors, or preservatives. All I used was 100% fruit juice (in this case, tart cherry sweetened with apple) and gelatin. Any gelatin would do but bear in mind there are some high quality products out there, like Great Lakes gelatin, made from grass-fed cows.
Enjoy and I look forward to catching up with you next week! I have a very cool book review in the works…
Sarah
Homemade Jello
Ingredients
• 2 c cold fruit juice, divided
• 1 tbsp unflavored gelatin
Cooking Directions
1. Place one cup juice in a bowl and sprinkle the gelatin over it. Allow to soften for 10-15 minutes.
2. Add the second cup of juice to a small saucepan over high heat and cook until almost boiling. Pour over the juice and gelatin mixture and stir for a minute, until the gelatin has melted.
3. Pour the mixture into a glass or plastic container or jello mold. Chill for at least 4 hours then turn out. Cut into squares or use cookie cutters to make whatever shape you’d like.
Tartine’s method is based on starting your own ‘starter’ or leaven batch that sits on your counter, and you feed everyday to keep it viable. I tried to make a starter, and it didn’t start. Then I got distracted for a few months.
Then I again picked up the Tartine Bread book. Its a beautiful book, clearly the authors and photographer worked hard on this. I decided to try once again to make the starter, which would allow me to make amazing bread.
This time I followed the instructions [ if all else fails, read directions ] and the starter started! So I read the first part of the book a bunch of times during the week, determined to bake Tartine Bread on the weekend.
The slow rise local leaven dough takes a while to become bread, there are two rises, the long one being either 3-4 hours in a warm place, or overnight in the fridge. The basic bread recipe makes two loaves, so for one loaf I did the 3 hour rise, and the second loaf i did the overnight fridge rise.
Constantly re-reading the directions, I actually baked bread, the first loaf was not bad, as shown in the photo, but the second loaf was pretty amazing.
Loaf with overnight refrigerator rise
We’ll be posting more posts on making bread with the Tartine Bread Book, and eventually a video too. I have a bunch of photos of starting the starter for the next in our Tartine Bread posts here.
Do you use a starter for your breads, how does it work for you? Let us know below:
Buy on IndieBound
I likeJacques Pepin. I don’t know him personally, but I watch his cooking shows, and his cookbooks. His style is GardenFork: a lack of pretention, a desire to share and teach.
In his book, Fast Food My Way, [ Amazon Link
, IndieBound Link ] there is a recipe for what he calls Fridge Soup. Jacques looks in the fridge, pulls out whatever leftovers there are, and makes a soup. Hence the name, Fridge Soup.
What I found neat was his use of grits in this soup. ( we talked about making grits with my neighbor Charlie on this episode of GF Radio here ). Jacques uses instant grits as a thickener for the vegetable soup.
Lightbulb moment for me, the un-expert in the kitchen.
We live quite a way from the nearest grocery store, and I avoid making a trip just to buy a few things, so for dinner this weekend, I decided to apply the Fridge Soup Methodology to a real world situation.
In our fridge we had carrots – we always have carrots, horse people, you know – cabbage left over from a fermentation experiment, onions, and a sweet potato.
So all this went into the pot. I started first with the onions and olive oil, added some crushed garlic. Then in went the carrots sliced up. ( Charlie Pup knows when you are slicing carrots, and will arrive to take care of the top of the carrot for you; Henry won’t eat carrots ) I like to try to get some browning on the carrots, not sure if it makes a difference, but I do it. Then the cabbage and sliced up sweet potato ( skin on , BTW ).
I added water to top it off and let is simmer. You could also do this in slow cooker. I did not add any vegetable stock or boullion; basically the ingredients were the stock, was my thinking.
I had some thyme from the garden that I hard harvested before the last big snowstorm, and it was slowly drying in a bowl in the kitchen, so in it went, though technically it wasn’t in the fridge.
Some wayward egg noodles from a half open bag were thrown in when I served the soup, and there you go: Fridge Soup .
I’ll have to experiment with using grits as a thickener for soup, neat idea. What do you do for simple soups from the fridge? Let us know in the comments below:
So this is one of those where I had some short ribs in the freezer, I defrosted them, and cooked them pretty much how everyone else does, and the short ribs come out tough, not fork tender.
I’m not a huge cookbook collector, but I have few general go-to reference cookbooks, and the braised short ribs recipes are all pretty much like this:
Sear the ribs in dutch oven or in a baking pan in the oven, add liquid, cover and cook for hours on a low flame.
Short ribs browned in oven
I did try the browning the meat in the oven method, because I think the short ribs can get cooked to fast when searing them. Or maybe this is all just in my head and not real food science…
Thinking this was one of those dishes I could safely ignore, I got sucked into the world of tweaking the GardenFork.TV website, and then realized how long it had been since I started cooking the ribs. I got up and turned them in the dutch oven, and let them cook longer.
I even cooked these in the afternoon, and then pour off the liquid, threw that in the freezer to separate the fat out – which worked, BTW.
I gently reheated the ribs which I had cooked with onions, carrots and about 2 cups of liquid, half red wine – half water.
But the ribs were tough, which bummed me out a bit, as they looked great when i first opened the package. Food guru Chris Kimball has taught me that meats like short ribs will turn tough if cooked too long. The proteins lock up and don’t allow any liquid in, thus being tough to chew.
Braised Short Ribs look great, taste tough
So many recipe give a time and oven temp to cook meat, but what I think recipes really need is a temperature to attain, and then the meat is done.
Have to work on this more. What are your thoughts on overcooking meat, especially things like short ribs? Let us know below:
GardenFork Viewer Kathlean made a brick pizza oven based on our How to make a backyard brick oven video, and put together this great video of how she made a pizza oven out of brick. Kathlean found the brick on freecycle.org, which is brilliant – i’m all about use what you got, and these bricks fit the bill. These bricks have holes in them, our brick oven bricks did not, but Kathlean puts the holes to good use, making the roof of the oven out of brick and black pipe that slides through the brick and supports it.
We’ve gotten a bunch of photos of back yard pizza and bread ovens, and i plan on putting together a photo gallery of the backyard ovens people have made inspired by our brick oven. Next on my list is an enhanced oven to bake bread. I need to increase the mass of the oven with more brick, and make a door to cover the front opening. Then we’ll heat up the oven with firewood to about 700F, let the fire die down, and slide in some loaves of bread. Neat.
Have you built a brick, stone, or cob oven? I’d like to hear about it, you can leave comments below:
I have been consumed by (and have been consuming) all things winter squash. I love trying all the varieties the local farmers grow – noting differences in texture to determine how best to use them. This was my first year to try a cheese pumpkin, and it’s now one of my favorites. Its flesh is smooth and so savory it could almost be served as soup without even adding stock.
Despite the fun I have experimenting with various squash, I always feel comfortable falling back on butternut. Some may argue its popularity arose from its ease of transport and preparation, but there’s no denying it also has good flavor. Did you know there are different varieties of butternut squash? Nutterbutters in particular are very sweet, and conveniently grow to a medium size.
I use butternut in this snack cake, but feel free to use any pumpkin or winter squash you’re currently enjoying. Just cut the squash in half, scoop out the seeds and pulp, rub with a little oil, and roast “face down” on a baking sheet until the flesh is tender.
Why a snack cake? I think this is too sweet to be called a pumpkin loaf, but it’s not so decadent as to be restricted to dessert. Heavily spiced and loaded with dried fruit and nuts, I think it’s a great afternoon pick-me-up but you could easily get away with eating a slice with your morning cup of coffee. Anything you top with a dollop of yogurt is breakfast, right?
Loaded Pumpkin Snack Cake
Ingredients
• 1 stick (1/2 c, 8 tbsp) butter
• 1 c sugar
• 1 egg
• 1 1/2 c flour
• 1/2 tbsp baking soda
• 3/4 tsp freshly grated nutmeg
• 1/2 tbsp cinnamon
• 1/2 tbsp cloves
• 1/4 tsp salt
• 1 1/4 c pumpkin/winter squash puree
• 1 1/2 c lightly toasted nuts (I used a combinatin of pecans and walnuts)
• 1/2 c dried fruit (I used a combination of tart cherries and raisins)
• 1/4 c lightly toasted seeds (I used pepitas)
Cooking Directions
1. Preheat the oven to 350 degrees. Butter a loaf pan and set aside.
2. In a large bowl, beat the butter and sugar until light and fluffy. Add the egg and beat until just combined.
3. In a medium bowl, whisk together the flour, baking soda, spices and salt. Add the dry ingredients to the butter mixture and stir until just combined.
4. Stir in the pumpkin puree until just combined. Stir in the nuts, fruit, and seeds until about evenly distributed. Pour into the prepared loaf pan and bake 50-60 minutes, or until a toothpick comes out clean.
The latest project in my head is to make and cure home made sausage. I signed up for a how to make sausage class at The Brooklyn Kitchen taught by Ben Turley, an owner of The Meat Hook who shares space with The Brooklyn Kitchen to learn phase one: how to make fresh sausage at home.
I’ve never taken a cooking class before, and was kinda ambivalent the day of the class, but I knew it would be good when I showed up at the classroom and was handed a cold beer by Valerie, who assisted Ben with the class.
Valerie offers advice on chopping herbs
Rather than one of those cooking classes where you just sit there and watch; we were going to learn how to make sausage by making sausage, guided by Valerie and Ben.
Ben first gave a short talk, and what stuck in my head was his goal of transparency in the food they sell, and their recipes. The sausages were to make were two types of sausage they sell at the Meat Hook, and we had in our hands the actual recipes they use to make them.
Eric mixes spices into sausage meat
The common wisdom is when many chefs publish their recipe for a signature dish in a magazine, they leave out crucial details. Ben didn’t leave out any details. He laid out exactly how to make good tasting sausage.
The key to making homemade sausage is the ratio of salt and spices to fat and protein, and Ben wrote it all out for us in grams. How cool is that?
We then broke into two teams and prepared two different sausages, while Valerie and Ben offered suggestions and guidance.
A few key things I learned about making sausage:
Pork Shoulder is best, with 30% fat to 70% protein ratio.
Have the butcher grind the meat for you with a 3/16 diameter grind
Mixing the meat and spices-salt together to the right consistency
Cook a small piece of the mixed sausage before stuffing it into casings, do a taste test.
Refrigerate sausage overnight before cooking, don’t stuff and cook right away.
To make sure the meat and ingredients have been mixed properly, and the salt has been kneaded into the meat, make a thin patty of the sausage meat, put it in your palm, and turn your palm upside down. Then count to 5. If the patty is still stuck to your upside down palm when you get to 5, the meat is mixed properly.
Each person got to take home two sausages from the class project. The next day they tasted amazing.
Well, I’m still working my way through that big jar of tamarind paste and really enjoying the journey. A dish that’s a hit in my household is one I’ve been making for a couple years now and was inspired by the overabundance of poblano peppers we had at the farm. We always had a surplus, in part because they are easy to grow organically but also because it seems like people don’t really know what to do with them. If you’ve never had poblano peppers before, I urge you to give them a try. They are considered a hot pepper but have a mild, pleasant heat that pairs beautifully with eggs, and they’re a great fit for stuffing.
This recipe is one that originally began by following Pham Fatale’s mirchi ka salan recipe but that I’ve adapted and simplified over time, so much that I’m avoiding calling this mirchi ka salan for fear of being called out by an Indian food expert. It may not be authentic, but it’s loaded with the flavors of Indian spices. Speaking of which, don’t let the long ingredient list deter you from giving it a try – I’ll bet you have some jars of spices just waiting to be put to good use.
We usually eat this Indian poblano dish over plain rice but sometimes switch it up by adding boiled, cubed potatoes to the sauce instead.
Spicy Indian Poblano Peppers
Ingredients
• 1 tbsp tamarind paste
• 1 tbsp honey
• 3/4 c water, divided use
• coconut oil (or neutral oil)
• 1 large onion, roughly chopped
• 3 garlic cloves, finely chopped
• large pinch of salt
• 2-inch piece of ginger, peeled and finely chopped
• 2 tsp cumin seed
• 1 tsp turmeric
• 1 tsp ground coriander
• 1-2 tsp chili pepper flakes (or omit, depending on your heat preference)
• 2 tsp garam masala
• 8 poblano peppers, chopped into bite-size pieces
• 1/2 c peanuts, finely ground in a food processor or spice grinder
• 1/2 c shredded coconut
• 1/2 c plain yogurt
Cooking Directions
1. In a small bowl, mix together the tamarind paste, honey, and ¼ c of the water. Set aside.
2. Place a large pan over medium-high heat and add enough oil to coat the bottom. Add the onion, garlic, salt, and spices and cook, stirring occasionally, until the onion is soft and translucent, about 5 minutes.
3. Add the peppers and cook another 5 minutes, or until they are just tender. If at any point things are looking too dry, add a tablespoon or two of water or oil.
4. Add the peanuts, coconut, and remaining ½ c water, reduce heat to medium-low, and let simmer for 5-10 minutes or until the mixture is a thick, cohesive sauce.
5. Stir in the tamarind-honey mixture and cook another minute.
6. Remove from heat and stir in the yogurt.
This is another of a series of articles about how to cook in a dutch oven, dutch oven recipes, and how to season cast iron and dutch ovens by Gary House, of Cooking-Outdoors.com. A big thank-you to Gary for contributing this.
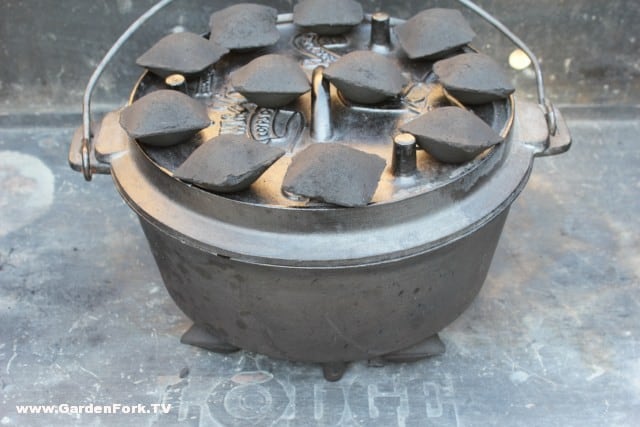
The key to successful outdoor Dutch oven cooking, is knowing how many charcoal briquettes are required to produce a certain temperature inside of your Dutch oven while it is cooking.
The secret to this knowledge is understanding charcoal briquettes.
Types of charcoal
Types of Charcoal
Charcoal briquettes produce more uniform heat than campfire coals or Lump charcoal, making your Dutch oven temperature easier to control. Brand-name briquettes have more consistent quality than bargain brands. They are consistent in size— about 2 inches square — which is important for predictable heat. Start with charcoal briquettes if you just beginning and experiment with live campfire coals as you progress.
How many briquettes do you need?
This is the basic foundation of Dutch oven cooking, once you know this, everything else falls into place. Take your Dutch oven’s diameter in inches and double it.
• 8 inch Dutch oven = 16 briquettes
• 10 inch = 20 briquettes
• 12 inch = 24 briquettes
• And so on.
The total calculation is the number of standard-size charcoal briquettes you will need to heat your Dutch oven to approximately 325 degrees F for one hour.
It is that simple.
Controlling temperature
Most Dutch oven beginners are familiar with cooking on a stove at home, cooking with bottom heat only and that can cause confusion when cooking outdoors with a Dutch oven.
Because heat rises, briquettes heat the bottom of a Dutch oven more quickly and directly than the top. The top rim of the lid draws the heat downwards, you will need to divide your briquettes between the top and bottom for even heating. Commonly referred to as the three up method and is effective on 8, 10 and 12-inch diameter Dutch ovens; larger size Dutch ovens may require more briquettes.
As an example:
• To heat an 8-inch Dutch oven to 325 degrees, you need 5 coals on the bottom and 11 coals on top. Sixteen coals total.
• To heat a 10-inch oven, you need 7 briquettes on the bottom and 13 on top. Twenty coals total.
• To heat a 12-incher, you need 9 briquettes on the bottom and 15 on top. Twenty-four coals total.
These guidelines will get you close enough that, with practice, you can understand exactly what works for your Dutch oven.
Briquette placement
Top ring & bottom ring placement
Using the circle method of coal placement, place your bottom coals in a single circle aligned with the legs of your Dutch oven closer to the outside of the Dutch oven bottom, referencing the lip of the Dutch oven lid place your coals evenly around the perimeter.
Variables
If your recipe calls for temperatures higher or lower than 325 degrees, make adjustments by adding or subtracting 2 briquettes. Two briquettes equal approximately 25 degrees. Add these to the top of the Dutch oven, unless you need more heat on the bottom.
How long do briquettes last?
Today’s charcoal briquettes last about 45 – 50 minutes. When recipes call for longer cooking times, start fresh replacement briquettes at 40 minutes. They will be ready to add to your Dutch oven when the original coals start losing their heat. Replace approximately 60% of the coals each 45 – 50 minutes of cook time.
Compensation for weather conditions will be required. On cold days, add a couple of more coals on the top and on a hot day remove a coal or two. Wind will play a significant roll in temperature control, it is best to shelter your Dutch oven from the wind with a windscreen if possible.
Following these basic concepts will insure your first adventures in Dutch oven cooking are a success. After practicing a few recipes, temperature control will become second nature and you will no longer need to count as you become more proficient.
Here is one of my favorite beginner recipes, the same one I use in my Dutch oven classes.
Blackberry cobbler
Blackberry Cobbler
Ingredients
For the cake mix:
1 stick butter
2 cups flour
2 cups sugar
1 tbs baking powder
1tsp salt
1 1/2 cups milk
For the berries:
4 cups fresh or frozen blackberries or 2 bags frozen (thawed)
½ cup sugar
1 ½ tsp fresh grated lemon zest
¼ cup water
1 tsp cinnamon
10 or 12” Dutch oven (20 or 24 briquettes)
Start your briquettes using the formula above to determine the quantity.
Rinse your fresh blackberries and drain, place them in a bowl with your sugar, lemon zest, water and cinnamon; mix well and set aside.
When your briquettes are ready, place the bottom circle of briquettes down and set your Dutch oven with the lid on top of the briquettes, then add the remaining briquettes to the lid to pre-heat your Dutch oven.
Now you can mix your cobbler batter. In separate bowl combine flour, sugar, baking powder, and salt; stir to mix. Add milk and beat until batter is smooth.
Remove the Dutch oven lid, take one stick of butter and place in hot Dutch oven, stir until melted. Add your Blackberry mixture to the melted butter and pour your cobbler batter over the top
(A different variation of this would be to take your batter and pour that in first place your blackberries on top.)
Mike recently tweeted a challenge: Come up with a snack that would fix his crunchy-sweet-salty craving without going overboard on calories. When Monica suggested roasted chickpeas, I also got a hankering in need of quenching. So, I set out to recreate a recipe I used to make often. Why had I stopped? Well, somehow this particular snack slipped out of rotation, I guess. I’m always experimenting and there’s just not enough time (or room in my stomach) for all things tasty. Thanks Mike and Monica for resurrecting this treat back into my life!
Some tips for roasting chickpeas:
Cook your own chickpeas from dried beans. You can use canned but the texture won’t be nearly as satisfying.
Cool and dry the chickpeas. You want the beans to be really dry so that they crisp up well. If you cool them in an open container in the fridge they should lose enough moisture to avoid the labor of patting them down with a paper or dish towel.
Don’t be afraid to cook them a little longer than you think you should. You’re looking for a deeply golden color to reach optimum crunchiness.
Experiment with seasonings. You can add your favorite herbs or spices to the base recipe below. I love garam masala, red pepper flakes, or finely chopped rosemary.
Sweet and Salty Roasted Chickpeas
Ingredients
• 2 c cooked chickpeas
• 2 tbsp brown sugar
• 1/2 tbsp olive oil
• 1/2 tbsp kosher or sea salt
Cooking Directions
1. Preheat the oven to 400 degrees. Toss the chickpeas with the brown sugar and olive oil and spread in a single layer on a baking sheet or in a baking dish.
2. Roast the chickpeas for 30-40 minutes, stirring every 10 minutes or so, until golden brown and caramelized. Don’t be afraid to let them go “just a little longer”! Toss with the salt while hot.
In our honey tasting episode, I described one of my favorite smoothies – one made with beets– that subsequently caught some Twitter flack. I should have noted that the beets should be roasted, and since this is a snack I really do love, I thought I’d elaborate on the recipe and perhaps provide a disclaimer.
Actually, let’s cover the disclaimer first: This smoothie is for the beet-lover. If you are in the camp that beets taste like dirt or if you are on the fence regarding this vegetable, this will not be the preparation to convert you. Still interested in a taste? Alright then, let’s go…
The natural sweetness of apples and roasted beets plus a stealthy dose of spinach make this smoothie a great way to start your morning or to sip on as an afternoon pick-me-up. Even its fuchsia hue it uplifting. Bonus: It can also be served as a cold soup.
Roast the beets ahead of time so they have an opportunity to chill in the fridge. Use whatever apple variety you’d like, but I highly recommend Pink Lady – its tart sweetness makes the smoothie a little special. The recipe is easily doubled, tripled, etc.
Beet Smoothie
1 serving
Ingredients
• 1 medium beet, roasted, cooled and peeled
• 1 apple, cored (Pink Lady is best)
• handful spinach
• kefir, yogurt, milk, or water as need (I use kefir)
Cooking Directions
1. Blend the beet, apple, and spinach on high in a blender or powerful food processor until smooth.
2. Add liquid as needed to bring to desired consistency.
This Porchetta recipe is a great use for a pork shoulder or pork butt. I fell hard for porchetta after having the porchetta sandwich at the amazing Porchetta restaurant in the East Village in NYC. Then I got Anne Burrell’s cookbook, Cook Like A Rockstar, and right there was a recipe for Porchetta. yum.
I like Anne Burrell, her book, and her approach to life; down to earth like GardenFork, no pretension, just being who she is.
We were recently at the Brooklyn Flea in Brooklyn, NY and Porchetta was selling pork sandwiches and they were awesome.
Our Porchetta Recipe is based on those that have come before us, like Porchetta’s recipe here, and Anne’s recipe in her cookbook.
We bought a deboned picnic shoulder from our local butcher for this recipe. You could remove the bone yourself, but your local butcher can do it in about 2 minutes, and its fun to watch too. We did not score the pork skin, but that is a classic method when making porchetta, it makes more of the skin crackling, if you know what I mean. We used a mix of white wine and chicken broth cooking the vegetables and basting the pork, but you can use what you got and it will be fine.
Porchetta, Roast Pork Shoulder Recipe
Ingredients
• 1 Pork Shoulder, deboned
• 1 cup chopped chives
• 3 stems fresh rosemary
• 1 cup chopped parsley
• 4 cloves garlic, mashed or fine chop
• 1/4 cup virgin olive oil
• 1 bottle white wine
• 1 cup chicken broth
• 1-2 quarts chopped root vegatables, onions, potatoes
Cooking Directions
1. Take the pork shoulder out of the fridge and allow it to come to room temperature for an hour.
2. Preheat the oven to 475F
3. Cut up the herbs, mix and mash together in a bowl with the olive oil, season with salt and pepper.
4. Roll open the pork shoulder, place the herb-oil mix in the meat, roll the shoulder up and tie with butcher\’s twine as best you can.
5. Chop up your root vegetables, carrots, sweet potatoes, onions, winter squash, parsnips, whatever you got, into bite size pieces and lay them in the bottom of a roasting pan. Add a bottle of white wine, you can also use red if that\’s what you got.
6. Lay the stuffed pork shoulder on the bed of vegetables, insert a meat thermometer.
7. Put in the oven at 475F for 30 minutes, then turn down the oven to 350F and cook until the center of the pork is 145F. this will depend on how large your pork shoulder is. Approx 1 – 1.5 hours.
8. Allow to rest for 30 minutes then carve and eat.
Have you made porchetta? what is your favorite pork shoulder recipe? let us know below!
This recipe is one many that I’m developing for an cookbook project called Kimcheelicious. It’s about home-fermentation and cooking with kimchi that you make in your own kitchen. I’m raising funds on Kickstarter.com to get this book off the ground.
Sweet Potato and Kimchi Fritter (makes roughly 20 fritters)
1 1/2 cup sweet potato, grated
1 cup mashed potato (Russet or Yukon)
1/2 cup Napa cabbage kimchi, well drained and minced, reserve juice
1/2 cups onion, minced (white or Spanish)
1/2 cup Poblano pepper, cut into match sticks
1/2 cup corn starch
1 egg, beaten
2 tsp sugar
1/2 tsp nutmeg
1 tbsp granulated garlic
1 tbsp salt
2 tbsp toasted sesame seeds or 1 tbsp dark sesame oil (optional)
2 tbsp coarse Korean chili (optional)
high frying oil (canola or soy)
Dipping Sauce: Mix all these ingredients together.
2 tbsp kimchi juice
2 tbsp soy sauce
1 tsp rice vinegar
2 tbsp water
1 tsp honey
1/2 tsp dark sesame oil
1 clove minced garlic
Prep: Boil potato, mash and cool. Cut pepper into matchsticks, rough 1 1/2″ in length. Drain kimchi well in a colander and press into a paper towel, and mince. Mince onion. Reserve the juice for sauce. Grate sweet potato. In a large bowl, combine all these with dry ingredients. Beat egg and mix everything well well. Refrigerate for 20 minutes.
In a wok or large pot, add oil to the depth of at least 2″. Heat oil to 375°. You can also check the temperature with the end of a wooden spoon or a chop stick. When bubbles form around end the oil is ready for frying. Be sure to cover with a splatter screen wen frying. For larger batches: If oil starts smoking or becomes very cloudy, lower heat or allow to cool and change oil.
Scoop sweet potato batter with a large dinner spoon and pack tightly, squeeze out excess juice as you form a fritter. Drop into hot oil. Fry no more than 6 to 8 fritters at at time, allowing 3 minutes on each side or until the fritters are crisp and golden. Drain well on a rack or paper towels. If serving later keep warm in oven at a low temperature (100°). Serve while they’re crisp and hot with dipping sauce.
You can freeze in batches for future meals. Freezing actually preserves flavor and nutrients such as vitamins A and B. To prevent them from freezing into a large boulder, freeze them individually first. Form fritters and place them onto tray with at least 1″ of space between. Put them in the freezer for about two and a half hours then put them into a large freezer bag. Deep fry as instructed above.
My friend Elaine’s mother is the consummate southern Italian cook. Mama Lena shared her meatball recipe with me over the phone, but I had to figure out the proportion of ingredient. After a few batches I think I came close. Lena’s meatball recipe makes roughly 50 small meat balls.
2 spicy Italian sausages (remove casing)
1 lbs ground beef (80/20 fat)
1/4 ricotta cheese
1/8 cup grated Parmesan cheese
1/4 cup unseasoned bread crumbs
1/4 cup minced onion (fine)
1/4 minced parsley (fine)
1 tbsp each: dried oregano and basil
1/2 tsp salt
1 egg
3/4 cup olive oil
4 cups of marinara sauce
The key to rolling perfect meatballs is a little olive oil. Also don’t crowd the pan, cook in small batches (8 at at time). Mix all ingredients well with your hands, set aside for 20 minutes. Coat the palms of your hands with a little olive oil, pinch a golf ball size portion and roll into a tight ball, make enough for the week. Apply olive oil again if the meat sticks to your hands.
Heat a large saute pan and add enough marinara sauce cover half the depth of the meatballs. Add meat balls to the pan, cover and braise for 8 minutes. Turn meatballs over and braise for another 5 minutes. Set them aside and start a new batch. Add more marinara and a little water if the sauce becomes too thick. Serve meatballs with sauce over your favorite pasta with a little fresh parsley and more grated Parmesan. You can freeze meatballs without the sauce and reheat them in the oven for another meal.
To curb a budding takeout addiction, I learned how to make Pad Thai at home. Although some recipes call for a substitute of lime juice, the dish traditionally relies on tamarind for its acidity, so I purchased a jar of tamarind paste. I have since become smitten with its sour-sweet bite and am experimenting with other ways to use this new-to-me ingredient. Otherwise, that jar would wind up forgotten in condiment purgatory, better known as the door of the fridge.
So far I’ve been sticking with riffs of Pad Thai: rice noodles, vegetables, and roughly Asian ingredients. I’m sure it’s all far from authentic, but what’s more traditional than taking what you have on hand to put together a meal? The recipe below is a recent dinner using tamarind that comes together quickly and with relatively few ingredients but is still flavorful and satisfying. If you try it out, let me know what you think. And please pass along any of your tamarind-inspired recipes – It’s no small jar!
Rice Noodles and Green Beans with Tamarind-Almond Butter Sauce
Ingredients
• 1/2 lb green beans (or three large handfuls), cut into bite-sized pieces
• 6 oz linguine-style rice noodles
• 1/4 cup creamy almond butter
• 2 tbsp tamarind paste
• 2 tbsp soy sauce or tamari
• 1 tbsp rice vinegar
• 1 tbsp honey
• 1/2 tsp chili pepper flakes
Cooking Directions
1. 1. Bring a medium pot of water to a boil. While waiting on the water, in a small bowl mix together the almond butter, tamarind, soy sauce, and rice vinegar, honey and chili flakes. You may need to add upward of a ¼ c of water to bring the sauce to the consistency of salad dressing.
2. 2. Add the green beans to the boiling water. After a minute or two, turn off the burner and add the rice noodles. The rice noodles should be softened and the green beans fork tender in about five minutes. Strain the water and return the beans and noodles to the pot. Toss with the tamarind-almond butter sauce and serve immediately.
3. Serves 2 generously
This is the third of a series of articles about how to cook in a dutch oven, dutch oven recipes, and how to season cast iron and dutch ovens by Gary House, of Cooking-Outdoors.com. A big thank-you to Gary for contributing this.
The good news is that almost all new Dutch ovens come pre-seasoned direct from the factory. Today’s seasoning process at the factory is so good; you can use your new Dutch oven right out of the box (after washing) without going through the initial seasoning process. New Dutch ovens will still require continuous seasoning to build up the layers of protection.
Seasoning is the process of applying thin layers of grease or oil and baking until absorbed into the cast iron. This continuous process builds up layers of “carbonized” oils, protecting the surface from rust and giving you that desired non-stick coal black patina coating.
Vegetable oil, olive oil, bacon grease, Crisco, lard and premade seasonings are commonly used to season cast iron. I cannot tell you what one is best for you and everyone has their special grease or oil that they prefer; I will recommend you try grease instead of oil, as it is easier to see when you apply too much allowing you to remove the excess. Personally, I use Crisco these days and it works very well for me.
If you do have an un-seasoned Dutch oven or skillet and want to season it here are 8 simple steps to make that process easy:
• Wash with soap and water.
• Dry completely with heat, a towel will not remove enough moisture. Place cast iron in oven for a few minutes or in the sun if hot out until it is too hot to handle with your bare hands but easy to handle with heat pads. (Cast iron absorbs grease and oils best when warm so apply your seasoning to pre-heated cast iron that is warm to the touch, no need to burn yourself. Pre-heating opens up the cast iron pores to allow the seasoning to be absorbed.)
• Before applying seasoning, check for rust. Now is the time to remove it.
• Lightly grease inside and out, you do not want the oil to pool or build up anywhere while you are seasoning your oven. Lightly means enough to change the color of the cast iron; do not apply a heavy coating that feels sticky to the touch.
• Place your Dutch oven upside down with the lid laying flat on the grate into a BBQ that can maintain 375° F consistently for one hour. If you use your oven in the house you could get a lot of smoke in the kitchen, consider yourself warned.
• Bake for 1 hour at 375° F
• Turn heat off, open lid and let cool.
• Repeat two more times for best results.
Your Dutch oven is ready to use!
For bests result, apply a light coat of seasoning to your Dutch oven after every use. This builds up the layers of carbonized grease every time you do this, giving you layers of protection and non-stick surfacing.
There may come a time when you need to re-season your cast iron; perhaps it is getting a little rust, some bubbles have formed or the finish is chipping off. All caused from improper seasoning or care, but easily fixed.
• Place your Dutch oven or cast iron skillet in a self-cleaning oven.
• Turn and lock oven in the self-cleaning cycle.
• Run until cleaning cycle is complete. Your Dutch oven will be a light grey color when done.
• Let cool for a couple of hours
• Repeat steps 1 through 8 above.
I will leave you with my 6 Golden rules for storing your Dutch oven
Rule #1
Never put away your Dutch oven dirty.
Rule #2
Never put away your Dutch oven wet.
Rule #3
Put a light coating of seasoning on your Dutch oven while it is warm from cleaning.
Rule #4
Air circulation prevents a rancid Dutch oven; store with the lid off or ajar.
Rule #5
Store your Dutch ovens in the house where the humidity is balanced.
Rule #6
Rotate your Dutch ovens when selecting one for a meal. The one on the bottom in the corner is all dusty is going bad on you!
Next time we will discuss temperature control when cooking and I will have an easy bread recipe for you!
Part Three of our Dutch Oven Cooking Series by Gary House, creator of www.Cooking-Outdoors.com; an excellent source for all things about outdoor cooking, including Grill & Smoker reviews, recipes, and videos.
Gary is also the host of a new DVD, Taking Your Dutch Oven To The Max, using the dutch oven to smoke, grill, and even make ice cream.
This is the second of a series of articles about how to cook in a dutch oven, dutch oven recipes, and how to season cast iron and dutch ovens by Gary House, of Cooking-Outdoors.com. A big thank-you to Gary for contributing this.
Last time we talked about the different types and sizes of Dutch ovens available to cook meals outdoors in. By now, you should have a solid idea of where to start in purchasing a Dutch oven for you and your family or perhaps you have resurrected that dusty black pot that’s been sitting in the corner since you brought it home.
Dutch oven cooking can become somewhat addictive, so I must warn you early, you can’ just own one! They seem to grow magically as time goes by, first a 12” then a 10”, maybe I need a 12” deep and really, a 14” is not as big as Gary says, etc. I have a collection of 10 active Dutch ovens, those that I keep handy to use on a weekly basis, but hidden away in the garage are another dozen “collectables” that need to be seasoned or I have to remove the rust, etc. This collection just seems to grow and grow and grow, consider yourselves warned.
For those of you with the will power to minimize and control those urges (un-like myself), there are a few accessories that you will want to add to your Dutch oven cooking arsenal.
Undoubtedly, the most important item you can start to add to your collection is a cooking platform; you need something to place your hot coals on when you cook with your Dutch oven. The bare ground is not a good option, as it will suck the life out of your coals in record time (a campground fire pit would be an exception as the ground there has baked into a hard heat-reflecting surface and will give you a solid cooking base). Those 45 minutes to an hour cooking time that you planned will reduce to 30 minutes or less if you just place your coals and Dutch oven directly on the dirt.
I started out with a simple 32-gallon garbage can lid. Just pop the handle off, stomp it flat and it will last for years (I still have my 5 year old model). If you are looking for a Dutch oven dedicated cooking table to use at home and when you go camping you have a few options:
Table
Lodge, Camp Chef and several other manufactures offer nice models that will run you $100 or more. Think about these things before you buy yours:
How many Dutch ovens do you plan to cook with at one time?
• 2 to 4 pots at one time then stick with a Lodge http://lodgemfg.com or Camp Chef www.CampChef.com Dutch oven cooking table.
• Six plus Dutch ovens get yourself a custom table from a reputable source.
My big Dutch oven cooking table comes from www.chuckwagonsupply.com, it holds 9 Dutch ovens at a time plus room to hang my tools.
Folding legs or stationary?
• Folding legs means you can travel with it.
Windscreen?
• This should come with the table but sometimes it’s extra and it is quite necessary. The wind can cause all kinds of havoc with your cooking times, so a screen is very important.
Carrying case?
• This is usually extra and worth every penny in my opinion
Height?
• Important! The higher the table the higher you have to lift those pots and if you decide to stack your Dutch ovens (cooking one on top of the other), you will want a low platform that reaches to just above your knees.
Weight?
• Bigger = heavier, longer lasting and more difficult to transport but I think the positives far outweigh the weight issue.
Utensils
Just the basics to get started, if you’re like me, you will add so much more stuff as time goes by that you shake your head in wonder – why didn’t I buy a bigger truck!
Gloves – leather welder’s gloves that cover the lower half of your arm
Lid lifter – indispensable tool that has multiple uses in addition to acting as a solid place to set your lid when you have to stir the pot or add additional food to your recipe
Charcoal tongs – Goes without saying that charcoal burns, so you will need a tool to move those hot coals around the Dutch oven as you cook
Charcoal chimney – used to light your charcoal briquettes with a single sheet of newspaper
Wisk broom – helps to dust the ashes of the Dutch oven lid and table
Lighter – or matches, your choice. Some people use flame throwers!
Safety gear
Never leave home without them!
Fire extinguisher
Shovel – a small shovel to move the spent briquettes from the cooking table to the bucket
Ash bucket – use a galvanized pail with a lid for safe transportation and storage
First aid/burn kit
Dutch oven cooking can be as simple as you want or need it to be, do not obsess over all of the accessories available, what you should or should not have, etc. Remember, it only takes one pot and a recipe to produce a fantastic meal. Cooking outdoors in a Dutch oven is a rewarding adventure that can keep your taste buds delighted for many years to come.
Next time we will discuss how to take care of all that cast iron I have talked you into buying!
Part Two of our Dutch Oven Cooking Series by Gary House, creator of www.Cooking-Outdoors.com; an excellent source for all things about outdoor cooking, including Grill & Smoker reviews, recipes, and videos.
Gary is also the host of a new DVD, Taking Your Dutch Oven To The Max, using the dutch oven to smoke, grill, and even make ice cream.


 I like
  In our fridge we had carrots – we always have carrots, horse people, you know – cabbage left over from a fermentation experiment, onions, and a sweet potato.