Category: Video

  • Cut Down A Tree With A Chain Saw : GF Video

    Cut Down A Tree With A Chain Saw : GF Video

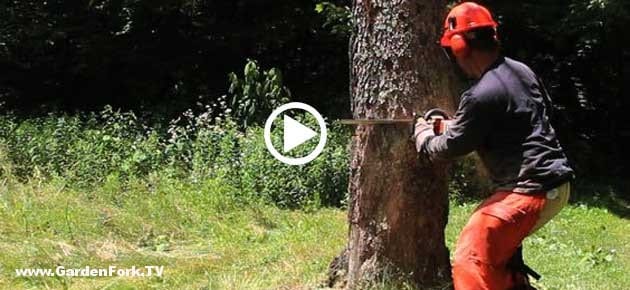
    How do you cut down a tree with a chain saw? Watch this GardenFork video. Watch us cut down a tree with a chainsaw safely. Be very careful when using a chainsaw or tree felling, if you don’t know what you are doing, hire a professional.

    Tree felling like this is pretty straightforward, there were no houses nearby, and the tree was already leaning the way we wanted it to drop. The wedge cut was fairly shallow, and the back cut was a bit off, it should have been a more straight cut just above the wedge cut.

    Going forward, we will be using more plastic wedges, which are driven into the back cut as the cut goes deeper into the tree. The wedges keep the tree from binding the saw, and help to push it in the direction you want it to drop. Do not use metal wedges. The metal wedges can damage the chain of  your chain saw if they come into contact with each other.

    cut-down-a-tree-with-a-chain-saw-gf-video-3

    And again, safety is paramount here, watch all our how to chainsaw safely videos here. Chain saw chaps are a must, I recently saved my leg from a nasty cut from the chainsaw because I had chainsaw chaps on. The chaps have a material in them that will bind the saw if the saw tears open the chaps, which are protecting your legs.

    cut-down-a-tree-with-a-chain-saw-gf-video-2

    I use an all in one helmet that has a face shield and ear protection, plus i wear steel toed boots, long sleeves, and gloves. Be Careful OK?

    Click here to watch all our chainsaw vids and related posts here

    Let me know any questions or comments below:

  • Broken Lawnmower Wheel Repair : GF Video

    Broken Lawnmower Wheel Repair : GF Video

    Fix a broken lawnmower wheel: watch our lawn mower repair how to video and get back to mowing you grass. The tire on our mower broke, here’s how to fix it.

    When the lawnmower broke, the camera operator, who happens to love mowing the lawn, thought we needed to buy a new mower! No, for about $10, we fixed our grass cutting machine, and the camera operator is now out cutting the grass before dinner. Not a bad deal for me…

    The lawnmower wheel repair was not difficult. All you need is a metric or standard wrench, depending on the make of the machine. An adjustable wrench will work as well, but the correct size wrench is better. Pay attention to how the tire is attached to the mower, remove the nut holding it to the threaded axle, along with any washers that may be with it. Take a picture with your cell phone as you disassemble the nut and tire unit, it will help with putting the whole thing back together.

    Take the tire to your local hardware store to match it to a replacement. Our wheel was an 8″ diameter, which seems pretty standard for push mowers.

    Lawnmower wheel

    Bring back the new one and slide it on. There may be a metal or plastic bushing inside the wheel so the tire can fit on different diameter axles. Secret tip: use some anti-seize paste on the axle threads before attaching the wheel. If you ever have to remove the wheel again, this will make the job much easier.

    Get a neat set of wrenches here.  (Affiliate link)

    And there you go. Job done, now how to convince your significant other that mowing the lawn is exercise?

    We have a how-to video on how to tune up a lawmower here,  and And a how-to video on how to sharpen the blades of a lawn mower .

  • Vegetable Garden Tour : GF Video

    Vegetable Garden Tour : GF Video

    A quick tour of the garden and what is going on in the yard here for you all. Let us know what you are doing in your garden in the comments below!

  • Simple Rhubarb Cake Recipe : GF Video

    Simple Rhubarb Cake Recipe : GF Video

    Make this simple rhubarb cake and and learn how to cook rhubarb in this easy cake video. This rhubarb recipe is based our Peach Dump Cake Dessert Recipe video, link here. What’s great about this recipe is that it doesn’t take long to bake and you’re ready to go out in the yard instead of being in the kitchen.

    This rhubarb recipe can be adapted to use most any fresh or canned fruit. Like its cousin, the Peach Dump Cake recipe, it uses a quick cake recipe and adds in fruit. We found that simmering the rhubarb in some sugar before adding it to the cake batter works really well. Our oven usually takes longer than most to bake cakes, so this recipe should take about 30 minutes in  your oven.

    If you want to make this recipe and its winter, you can buy frozen rhubarb in larger supermarkets now. Neat. I imagine frozen would not need to be cooked as much beforehand, as the freezing breaks it down some.

    simple-rhubarb-cake-recipe-1

    We have a bunch of how to grow and cook rhubarb videos on our site, here is the link. Our first rhubarb video we did when our Yellow Labrador Henry was just a pup, and she was eating my notes while we were shooting the show. Watch our first rhubarb recipe video here.

    Let us know your thoughts and suggestions and ideas in the comments below, are there new ways to use rhubarb in recipes? Have you ever eaten it raw? I have, it has quite a taste!

    Simple Rhubarb Cake Recipe
    Ingredients
    •    1 cup All purpose Flour
    •    1 1/2 Teaspoon Fresh Baking Powder
    •    1/2 Teaspoon Salt
    •    1 stick Butter
    •    1 cup milk
    •    1 1/3 cups sugar – use less if you want
    •    2 cups rhubarb
    Cooking Directions
    1. Preheat the oven to 375F
    2. Cut the Rhubarb into 1/2\’ pieces, toss into a small pan with 1/3 cup sugar over low heat, simmer for 5 minutes or until the rhubarb is slightly soft. You may want to drain off some of the water from this to keep the cake batter from being too wet.
    3. Mix all the dry ingredients together
    4. Add the milk and slightly cooked rhubarb. The batter may look pretty wet
    5. Pour the batter into a greased 8 x 8 cake pan. I like to use a glass pan for this. It browns the cake nicely.
    6. Bake for 30 minutes and test for doneness. The top of the cake should be nicely browned, but not too toasted.
    7. This rhubarb recipe goes well with ice cream.

  • Foraging For Wild Garlic : GF Video

    Foraging For Wild Garlic : GF Video

    Foraging for edible plants in the spring includes looking for edible wild greens like wild garlic, also called spring garlic. This edible wild food is one of the first plants to start growing after the long winter, and is ready for your dinner plate. Wild Garlic looks like a young scallion plant or chives, and is edible. The taste has a slight garlic aroma, but its definitely in the onion taste family. You can find this edible plant growing in lawns and forest edges. Many consider it a weed, however we think it a great addition to salads or meals.

    Be Safe In Your Foraging!

    Double check with a good plant identification book! At the end of the post are some books we suggest. Always be sure with your plant identification before adding this to your soup.

    According to Wikipedia, when cattle eat wild garlic, it can give a garlic-like taste to the milk and beef, interesting. It is native to Europe and considered an invasive here in North America.

    foraging-for-wild-garlic-2

    I see this edible plant growing in yards a lot. I’m sure the homeowners don’t realize they have food growing in their yard! To harvest the wild garlic, its best to use one of those 3 pronged garden fork hand tools. You have to dig down a bit to get out the bulbs, or you can snip off the green stems and they will grow back. As the plant matures, unfortunately the stems get woody and aren’t good eating. If you pull this plant out of a park or someone’s yard, make sure it hasn’t been sprayed with an herbicide. Not a good thing to be eating that stuff.

    Foraging Videos

    Let us know what you know about this plant or any questions below:

  • DIY Bee Vacuum Video

    DIY Bee Vacuum Video

    Make a DIY Bee Vacuum. Usually a beekeeper can just shake a swarm of bees into the bucket and walk away. Every now and then, however, a vacuum is the only way to get the bees. In this short video, Rick shows how he constructed a bee vacuum for less than $25.

  • Raised Bed Garden Plans For A Self Contained Garden : GF Video

    Raised Bed Garden Plans For A Self Contained Garden : GF Video

    This raised bed garden plan video is perfect for a school garden project, or for building raised beds on a concrete or asphalt playground. This kind of raised bed is also good for raised beds on top of contaminated soil. This self contained raised bed is a plywood box supported by concrete blocks, a plastic liner keeps moisture away from the wooden sides of the raised bed.

    I saw this raised bed at a Whole Foods in St Louis, MO. I like the simple design of the raised bed, one can build it with a few tools and a saw. This kind of bed would be great for a school that wants to build a garden in a playground or parking lot. You don’t have to dig up anything, just build these raised beds and drop in the soil. If you have soil contamination in your yard, yet you want a vegetable garden, this design will work for you. ( we have another video coming up about gardening in or on contaminated soil, join our email list to be alerted to that video post )

    raised-bed-garden-plans-for-a-self-contained-garden

    This design uses treated plywood for longevity, and the treated plywood is kept separate from the garden soil by a plastic liner. The raised bed is supported by concrete footers that are usually used to build decks. Holes are drilled through the liner and plywood for drainage.

    raised-bed-garden-plans-for-a-self-contained-garden-2

    This kind of container gardening requires one to pay attention to the moisture level of the garden soil in the raised bed. This soil will dry out faster than the surrounding earth. I think a soaker hose drip irrigation system – drip irrigation video here – would work great for this bed.

    raised-bed-garden-plans-for-a-self-contained-garden-3

    What kind of raised beds do you have? ? Questions, Comments? please let us know below:

  • In Memory of Mij, Labrador Video Memorial : GF Video

    In Memory of Mij, Labrador Video Memorial : GF Video

    Mij, our neighbor’s Yellow Labrador Retriever who appears in many GardenFork videos, passed away recently. I went through a lot of the video clips we have of Mij and put together a DVD for his family, and then we decided to share it with all of you as well.

    Here is 12 minutes of Labradors, also appearing here are Moose and Charlie Pup when they were puppies.

  • Filling an Unwanted Swimming Pool

    Filling an Unwanted Swimming Pool

    Here is Rick’s pool being filled in:

  • Daylilies – Foraging for Edible Plants : GF Video

    Daylilies – Foraging for Edible Plants : GF Video

    Foraging for wild plants starts in your backyard with foraging for daylilies. These edible plants in the yard are an edible wild food. Today we talk about foraging the young shoots of the common Daylily, which are edible and great in salads. Daylilies are a non-native, and can be an edible invasive plant, especially the common orange daylily, which grows throughout the eastern U.S.


    Harvest the young shoots of the daylily for one of the first foraged meals of the spring season. The plants leaves will grow back, just be sure not to whack too many of them if you want them to grow again. If you find the invasive plants in a natural area, like a forest or meadow, its ok to harvest with abandon, in my book. Daylilies belong in your yard, not natural areas. Here is some information on the invasive kinds of daylilies from the National Park Service.

    You can eat other parts of the daylily, but for this foraging video, we will focus on the young leaves. We’ll talk about harvesting other daylily parts in upcoming videos.

    On a tangent, there has been talk of terminology, and that we should not be forarging, but instead wildcrafting. Wildcrafting is fun word, it brings up all sorts of imagery in your head when you say it.

    Also there are issues of what and how much of something one should harvest when foraging. On foraging for daylilies, I believe its OK to harvest what you want, as long as its in your yard or you have permission to be where you are, as these are non-native plants in the U.S.

    nettles-garlic-mustardWatch All Our Foraging Videos Here

     foraging books

    Buy Foraging Books on Amazon Here


    Buy Foraging Books on IndieBound

  • Seed Starting in a Hoop House Cold Frame : DIY Video

    Seed Starting in a Hoop House Cold Frame : DIY Video

    Starting seeds in a hoop house cold frame is like putting a greenhouse on your vegetable bed. The hoop house warms the soil and then you drop seeds right into the soil. No transplanting or grow lights, no transplant shock. This is our cheap PVC hoop house that can be made with salvaged or recycled materials, and then you can grow vegetables in the hoop house. What I love is how the cold frame warms the soil to 15F above the ambient soil temperature.

    Plants that do well  for seed starting in a hoop house are those that are cold tolerant. What the cold frame offers is a warmer soil and air temperature, which aids in germination. Yes, peas can be planted in snow, but they germinate much better in slightly warmer soil, same for lettuces and cabbages like kale, just a bit warmer and they sprout better. For this video I put sugar snap pea seeds in and radish seeds. Radishes are one of those seeds that are kinda fail-safe, so you feel ok even if some of the other plants didn’t take as well.

    hoop house cold frame plansWe have several videos on how to build a hoop house cold frame and how to use a plastic greenhouse like this, here is the video of us building our first cheap hoop house. I think its key to have the thermally controlled vent, if it gets too hot, you might consider putting a vent on each end of the hoop house. The PVC we use in this cold frame could be salvaged or recycled from another project or job site. The plastic we use is 3 mil plastic from the hardware store. With care this plastic will last several years. In the middle of summer, I hang my hoop house on the back side of the woodshed, and the plastic stays in good shape for a few years.

    seed starting hoop house
    Salad Greens Grow Really Well In A Hoop House

  • Repair Of Our Hoop House Cold Frame : GF Video

    Repair Of Our Hoop House Cold Frame : GF Video

    Setting up our simple cheap hoop house greenhouse for seed starting. This PVC hoop house cold frame works well for us and it was easy to build, here is the video of us building our the hoop house. The hoop house greenhouse allows you to get a head start on planting vegetables and seed starting. We started this in February to start warming the soil. This can be made for free if you find some scrap leftover lumber and PVC pipe. This plan uses short lengths of PVC pipe, which you may find laying around your yard, or your neighbor’s yard.

    My hoop house plans for this mini greenhouse are simple. Some 2x4s, some PVC pipe, and a piece of plywood. The thermal actuated vent keeps the hoop house from overheating. Link to buy the thermal greenhouse vents

    I use 3 mil clear plastic from the hardware store, it lasts a few years with care. I hang our mini greenhouse on the back of a shed when i am not using it. To attach the plastic to it, I fold the plastic over on itself and use lots of staples. You could also use a piece of lath or thin wood to hold the plastic to the wood. For the ends, I staple the plastic to the plywood end with the thermal vent and then cut off the excess plastic. For the other end of the cold frame hoop house, I simply bunch up the plastic and staple it to the 2×4.

    Cheap-Hoop-House-Greenhouse-Setup-2

    After a few days on your vegetable bed, this portable greenhouse will start warming the soil. Its amazing how warm it is inside the hoop house compared to the outside temperature. We have a video showing how a hoop house greenhouse can defrost your garden soil coming soon.

    In the video, the plywood I used for the end of the greenhouse, OSB, is not the best kind of plywood for outdoor uses. Use a better piece of plywood and paint it with a few coats of latex paint, it will last much longer if its painted.

    hoop-house-cold-frame-play

    Click here to watch our How To Build a Hoop House Cold Frame Video

    How-to-build-a-cold-frame-hoop-house-3

    Click here to watch How to build a cold frame video.

    Learn how to grow food year round, read Eliot Coleman’s Four Season Harvest book and Nikki Jabour’s Year Round Vegetable Gardener.

    Do you use a hoop house greenhouse? let us know comments or questions below:

  • Winter Bee Inspection & Dead Bees – Beekeeping 101 Video

    Winter Bee Inspection & Dead Bees – Beekeeping 101 Video

    Another of our Beekeeping 101 videos on how to do a winter bee inspection. Links to more beekeeping videos at end of the post. This time we open up the beehives in late March to show us feeding bees in winter. Keeping bees in areas with snow and winter, you will want to add sugar cakes, aka fondant, in the winter, and then add protein patties in late winter – early spring to get the honeybees going early.

    You can open a beehive if its above 40F to do a quick winter bee inspection, if its in the 30sF, you can open it real quick to put some sugar on the top of the hive. Do not take the hive apart for a full inspection. We are just taking off the outer and inner cover, and looking in from the top of the hive real quick. The faster you do this the better, I think.

    winter beek check list watchHoneybees may not always crawl up to the top and show themselves, they may still be clustered in a lower super, so just leave them that way. If you come across a dead hive, as we did, my suggestion is to leave the hive be, tape up the entrances, and clean out the hive when it warms up. You tape the entrances closed to keep the wax moths from moving in as spring approaches.

    Dead Bees near sugar cake
    Dead Bees near sugar cake

    Why did my bees die? Its not always obvious. Condensation is a big winter killer, but since we switched to the insulated inner covers we built, click for the insulated inner cover post, we have not had a condensation problem in the beehives in winter. Every year we have had a beehive die in winter, it is hard to get them all through winter. So when a hive dies, don’t blame yourself if you have done the following:

    • Followed a plan for varroa mite control
    • Fed bees in fall with sugar syrup
    • Left enough honey in the hive for winter
    • Added sugar cakes or fondant
    • Used an insulated inner cover
    • Tilted the hives forward in fall

    Read more of our beekeeping posts here and watch beekeeping videos here. Thx!

    beekeeping-sugarcake-vid-thumb

    Questions, comments? please let us know below:

  • Maple Sap Collection Tips, Backyard Maple Syrup Project GF Video

    Maple Sap Collection Tips, Backyard Maple Syrup Project GF Video

    Halfway through collecting maple sap to make maple syrup, I made this video on tips on tapping maple trees and how to collect sap to make maple syrup. Shot on the iPhone, it looks pretty good.

    I use tree saver plastic taps and plastic lines to collect sap, i’m finding that buckets at each tree work pretty well. I have one large barrel that collects from two trees, and its kind of a pain to get the sap out. The benefit is if the sugar maple sap runs really well, the bucket can handle the sap. One time my smaller 5 gal buckets overflowed.

    There has been some discussion on how much sugar gets trapped in the ice that we remove from the sap buckets. My neighbors, old time maple syrup experts, remove the ice from their maple sap buckets. But then I was asked how much sugar is lost with the ice, and I don’t know. The questioner brought up Popsicles, and the fact that they are made with sugar that seems to freeze with the ice.

    maple-syrup-update

    It helps when hauling buckets of sap to have them only half full, its easier on your back and you splash a lot less. I store our sap in a big new trash can on the shady side of the house that has been surrounded with snow to keep the sap cool.

    Check out all of our how to make maple syrup videos here

    Here is a great PDF from the Univ of Maine on how to tap trees and boil sap

    Let us know  your questions or comments below:

  • DIY tapping maple trees for maple syrup – GF Video

    DIY tapping maple trees for maple syrup – GF Video

    Tapping sugar maple trees to make maple syrup is a big tradition in my part of Connecticut, so I wanted to show you how to tap maple trees to get maple sap to make maple syrup. We use plastic taps and tubing that are connected to buckets at the base of each tree. The advantage of using individual buckets is that some of the water in the sap will freeze in the collection bucket. The whole goal of boiling sap in an evaporator is to remove the water from the maple sap, so removing some of the water as ice is a super simple way to reduce your boiling time.

    Tubing Connector for tapping sugar maples
    Tubing Connector for tapping sugar maples

    We buy our taps and tubing from Leader Evaporator. The smallest length the tubing comes in is 500′, but don’t fret, its quite inexpensive, about $60 for that much tubing. To buy a lesser amount of tubing locally would cost just as much. We use Tree Saver taps. Buy a bunch of their tubing connectors too, you will need them to tie several taps into one bucket.

    In a future sugar maple tree tap video, we’ll connect several trees into one large collection barrel.

    Check your buckets every morning, scoop out the ice with a sieve, and then store the sap in a large barrel that is in a cold place packed with snow. The sap has to stay cold or it will spoil. You can tell if you sap has gone bad if it has a milky color to it.

    We have a bunch of maple syrup making videos, including how to boil down your sap into maple syrup, click here to watch our maple syrup videos

    Here is a great PDF from the Univ of Maine on how to tap trees and boil sap

    Have any questions or comments? Please post them below:

  • Install a Washing Machine : GF Video

    Install a Washing Machine : GF Video

    Learn how to install a washing machine in this GardenFork how to video. Eric shows how to remove your old washer machine, and how to put in the new clothes washer. The washing machine used in this video is a front loading clothes washer, but the install process is the same for a top loading clothes washer.


    The plumbing on a washing machine is pretty simple, you have the water supply lines and a drain line. The water supply lines are just like garden hose connections. I suggest you buy new water supply hoses with your new washing machine. Some new washers include the hoses in the box, check before buying new ones. Check the washer drain line to see if it needs to be replaced. If it is cracked or stiff, its time for a new one. Again, a new drain hose may be included in the washer box.

    Two important things when installing a new washing machine:

    • be sure to plug the washer into a GFCI outlet. That’s the kind that is used in bathrooms and laundry rooms.

    • make sure the washing machine is level. If its not level, it will vibrate across the room.

    After hooking up the new water lines and drain line, plug in the washing machine and set it to do a rinse and spin cycle, not a complete wash. This will test if the machine is level, as the spin cycle is when the clothes drum is spinning the fastest. If the washing machine starts to vibrate, turn it off and check the levelness of the washer. Adjust the feet of the washer and then lock off the feet, each foot has a lock nut.

    Install-a-Washing-Machine-2

    After using the washer, keep the door or lid open to allow the clothes drum to dry out. If you don’t do this, mold can start to grow in the washer. Many new front loading machines have a lint filter, its important to clean this out.

    I’ve also found out the hard way to remove all the coins from your pocket, the coins can get caught in the water pump.

    Here is a how to video we did on replacing the water pump on a washing machine.

    Have you put in a washing machine? let us know your thoughts and suggestions below:

  • Dog Treat Recipe Sweet Potato Dog Biscuits GF Video

    Dog Treat Recipe Sweet Potato Dog Biscuits GF Video

    Homemade Dog Treat Recipe! These dog treats are easy to make, and our dogs love these dog biscuits. I’m wondering if there’s a difference between dog treats and dog biscuits, maybe dog treats is a more general term and dog biscuits refer to baked dog treats like these sweet potato dog treats we made for the Labradors.

    While working on this recipe, I found the amount of milk you add varies depending on how large and how moist the sweet potato is. You want the dough to be kinda dry, like pie crust dough, not wet. I’ve reduced the amount of milk in the dog treat recipe here, after mixing in the dry ingredients, you can add more milk or water if the dough is too dry to work with a rolling pin.

    dog-treat-recipe-sweet-potato-dog-biscuits-2

    You also might consider adding in brewer’s yeast or powdered garlic to these dog treats, if you’ve found those ingredients help your dog’s health, or flax seed perhaps? What do you think?

    I add flax seed oil to our Labrador’s breakfast to supplement their omega 3,6,9 intake. Keep flax seed oil in the fridge, btw. If you want to buy flax seed oil, its usually kept in the fridge case of the health food store.

    If you don’t  have a dog biscuit cookie cutter, you can use a glass or tuna can to cut out round dog treats, but its fun for kids to make dog bone style treats.

    Here are some dog treat cookbooks you might want to check out, and let us know your dog treat recipes below:


    Sweet Potato Dog Treat Recipe : GardenFork.TV
    Ingredients
    •    1 Medium sweet potato
    •    2 cups whole wheat flour
    •    1 cup whole oats
    •    2 eggs
    •    3/4 cup milk
    Cooking Directions
    1. preheat oven to 350F
    2. poke 4-5 fork holes into sweet potato, microwave for about 8 minutes, or use the \”bake potato\” setting on your microwave. let the potato cool before handling it!
    3. mix the two eggs together in a small bowl, set aside
    4. remove the sweet potato from the skin and mash with a fork
    5. add the dry ingredients together with the mashed sweet potato
    6. add in then eggs and milk. you want a thick dough that isn\’t sticky, you may have to adjust the amount of milk.
    7. flour a board and roll out the dough, you don\’t want a sticky dough
    8. roll out to 1/2\” or 1/4\”
    9. cut out dog treats with cookie cutters or a glass or a tuna can or just use a knife to cut out whatever shape you like.
    10. grease a sheet pan with cooking spray, butter etc. put the dog treats on the pan
    11. pick up the leftover rolled out dough and form it into a ball again, and roll it out into a sheet, and cut more dog biscuits
    12. bake for 30 minutes or until slightly browned on top.

  • Cheap Grow Light Stand : GF Video

    Cheap Grow Light Stand : GF Video

    Easy grow light stand made from scrap lumber! Don’t buy one of those $100 grow lights, build this grow light stand to go with our DIY grow light video. Homemade grow lights have always been funky, but with this grow light stand, and our easy grow lights built from cheap shop lights, you won’t have to have this mess of lights and cords and rope to hang grow lights above your plant seedlings.

    I built this light stand out of scrap lumber I had in the garage, if you don’t have any, ask your neighbors or walk around the neighborhood on trash day, I bet you’ll find free wood to build this. You’ll need some chain as well, which you can get from the local hardware store.

    grow light video insert

    What I like about this grow light rig is that you don’t have to hang lights from the ceiling or some kludged together mess of ropes and wood. The side braces allow the light to be adjusted up as the seedlings start to grow. I’ve also got an idea for a stacked version of the grow light stand, so you can put one on top of the other and save space. neat.

    cheap grow light stand

    What kind of bulbs should you use in grow lights? I use regular old warm white or cool white fluorescent bulbs. Other may disagree with this, but here’s my thinking, we’re not growing plants, we’re starting seedlings, and the light output of these inexpensive lights works fine for me. Its been suggested not to mix the kinds of bulbs you use in a grow light made from shop lights, it can make the ballast wear out faster.

    cheap grow light stand

    cheap grow light stand

    cheap grow light stand

    Check out our special Seed Starting How To page here.

    What are your ideas for grow lights? let us know below: