• Pizza Oven Brick, How To Store It

    I just pulled a bunch of pizza oven brick out of a dumpster in Brooklyn. The contractors were taking down the parapet wall of a crumbling building near my house. I walked down with my hand truck. The crew were happy to help me sort out a ton of excellent brick.

    When I say pizza oven brick, I mean old school clay brick. We talk about this a bit in our pizza oven videos, but we can expand here. We don’t use fire brick in our home made pizza oven, we use used clay bricks. These old kind that we salvage from construction sites or we find online. I wrote about how to find used brick here.

    People have asked about the potential for bad things being in the brick that one doesn’t want touching their pizza dough. From what I understand, that potential is low to non-existent, because the pizza dough is only on the brick for a very short time. Not long enough to absorb anything, in my opinion, as long as the brick is clean.

    How To Store Pizza Oven Brick

    The beauty of our home made pizza oven is you can break it down. But, you have to store the brick somewhere. I learned the hard way that just leaving them out in the yard is bad. Over the winter, the bricks got wet, consequently, they froze and cracked over the winter. Bad Bricks!

    Pizza Oven Brick
    Snow and Rain will damage your bricks, don’t do this.

    Pizza Oven Brick

    So here is how I now store pizza oven brick.

    Grab two pallets, probably an easy thing if you are a GardenFork sort of person. Plan where you are going to store your brick. Ideally, this is not under the overhang of a shed, because we don’t want more water than necessary near the brick. Learn from me…

    Pizza Oven Brick
    Plenty of space between the bricks

    Put one pallet down on the ground, and stack the bricks on the pallet with air space between them. Because if the bricks do get wet, they can dry out. If they are stack tight together, they wont dry out as well.

    Pizza Oven Brick

    Place another pallet of the same size on top of the loosely stacked bricks. Finally, cover the whole stack with a waterproof tarp.

    Pizza Oven Brick

    What I have found is the tarp can pool water, so I make sure the side of the pallet with more cross pieces is facing up. Unlike the photo above… It wouldn’t hurt to slide a piece of scrap plywood over the top pallet, then the tarp.

    Homemade Brick Pizza Oven Video

  • You Need To Know About This Invasive Worm – GFR455

    Erin from The Impatient Gardener tells us about the Jumping Worm that is moving its way across the country. Not many have heard about this, myself included, but its not a good thing.

    These worms, which hang out on the upper layers of soil, are massive digesters of soil. This is not a good thing. What they leave behind is loose soil resembling coffee grounds and largely devoid of nutrients. Give them a little time and they destroy the composition of the soil to the point where plants are no longer anchored.

    They reproduce without mating, laying impossible-to-find cocoons in the soil that overwinter even in cold areas, and oh, by the way, they mature so quickly that two generations can be produced in one season. They do their damage quickly.

    Read Erin’s post about the invasive Jumping Worm here.

    Photos from Wisconsin Dept of Natural Resources.

  • File Cabinet Maple Syrup Evaporator Photos From A Friend

    Always love getting file cabinet maple syrup evaporator photos, these are from a friend who has greatly improved the GardenFork version 2.0 file cabinet evaporator. The photos tell the story best here. This is designed be used with a stainless steel evaporator pan made by our friend Zach of Silver Creek Maple Equipment. But you could certainly use this file cabinet with steam table trays, similar to our GF version 1.0 file cabinet evaporator.

    File Cabinet Maple Syrup Evaporator
    Super smart way to build your homemade maple syrup evaporator.

    My friend sent me this photo of his version of the homemade maple syrup evaporator and my jaw dropped. I had been trying to find a solution to how to slow down the heat escaping from the fire box, and here is the answer. A smaller firebox and a sloped channel to the chimney. There will be a baffle or bricks at the sharp bend in the floor of the cabinet. This closely mimics the arch of many evaporators I have seen.

    The back of the cabinet is cut along the sides to preserve the right angle corner, and this slips over the cut sidewall of the cabinet. Self tapping screws hold it all together. You could also weld this seam with a flux core or mig welder.

    File Cabinet Maple Syrup Evaporator

    The firebox is about 24″ deep, the fire grate was bought at Tractor Supply. You could do the same, or go to your local welding shop and pick up some scrap extended steel grate.

    File Cabinet Maple Syrup Evaporator

    File Cabinet Maple Syrup Evaporator

    To create some turbulence and keep the heat swirling under the pan, a firebrick, or sand or some steel will go right at the sharp bend in the bottom of the box here.

    File Cabinet Maple Syrup Evaporator

    Big thank you to my friend for sharing the photos and his crafty knowledge here. Read and see more about how to make maple syrup here.


    Steam Table Pan Maple Syrup Evaporator Improvements – GF Video

  • Does The Instant Pot Yogurt Recipe Work? GF Video

    I was skeptical about the Instant Pot yogurt recipe that is in the instapot manual, so I set out to test it and refine it. I am a big fan of the this multicooker. Watch my video below and read through the instructions below to learn how it all came out.

    Read on to learn how to make yogurt in the instant pot.

    How to make the Instant Pot yogurt recipe, step by step:

    There are 3 steps in the instant pot yogurt recipe process. Heating the milk, cooling the milk, fermenting the milk.

    A couple of decisions you have to make from the get go. What kind of milk should you use? Full fat or 2% works for me, the Fat Free milk isn’t great, in my opinion, but use what you got. You can use raw milk also, but I have not tried this yet. I am told not to use organic milk from the store, as it is ultra pasturized and the proteins wont line up properly to make the milk into yogurt.

    I use glass canning jars to make yogurt, this works for me. If you want to make a lot of yogurt, you can make a big batch right in the pot. Clean the jars with hot soapy water, running through a dishwasher works well also.

    Instant Pot Yogurt Recipe

    Pour a cup of water in the bottom of the cooker. Place in the bottom the wired stand thing that came with your multicooker. This will keep the glass jars above the water. Pour milk into the glass jars. Close the lid and make sure the vent is set to ‘sealing’.

    Press the ‘Steam’ button and using the plus and minus buttons on the control panel, set it to 1 minute. In a few seconds the Instant Pot will start the steaming process. It will take longer than one minute, so don’t stand there and watch it. Once the steam process is done, (about 15 min) the cooker goes into a keep warm mode. Turn off the cooker, but DO NOT open the lid. Don’t vent the steam either, allow for natural release. To do this, let the cooker sit for about 20 minutes, turn the vent to release any pressure, and open the lid. Remove the jars, place on grate to cool.

    Instant Pot Yogurt Recipe

    Cooling and Adding the Yogurt Starter To The Instant Pot

    The heated milk now has to cool to 115F or lower. When you hit that temperature, you can add your yogurt starter. I like this Yogourmet brand starter. You can also get some really cool heirloom yogurt starters here.

    Instant Pot Yogurt Recipe

    Remove the wire grate and water from the pot. Place the jars back in the cooker, close the lid, and press the ‘Yogurt’ button. Using the + and – buttons, set the Instant Pot to ferment the yogurt for 6 hours. I have found that the longer you heat the yogurt mix, the thicker the finished product is. 6 hours works for me, see the instructions that come with your starter. Let me know what works for you in the comments below.

    Instant Pot Yogurt Recipe

    You can also make yogurt in a styrofoam container or a cardboard box, learn here.


    How to make yogurt in a cardboard box – GF Video

  • Balsamic Vinegar Dressing Recipe GF TV

    Here’s a simple balsamic vinegar dressing recipe that you can make in 10 seconds. And here’s a video to show you how to make salad dressing. This salad dressing recipe follows most others, except for a secret flavor boosting ingredient! Watch the salad dressing video to see what the ingredient is.

    Store bought salad dressings are usually too sweet, and are full of calories and cheap vegetable oil. We call it ‘glop’, because that’s what it looks like. Using simple ingredients, Eric’s oil and vinegar dressing blows away this store bought stuff.

    This salad dressing is a vinaigrette, an emulsion of oil and vinegar bound together with mustard. You can use deli, brown, or dijon mustard. You can also use ground mustard, but use less than you would of the wet mustard.

    I’m thinking we should do a series of videos about salad dressings. This balsamic vinaigrette is our mainstay, but I’d like to experiment with miso based dressings, and make one of those carrot ginger dressings, like the one at DoJo in New York City. I’ve bought jarred carrot ginger dressing, but it doesn’t taste the same as the stuff we get in the restaurant.

    Eric’s Version of the Balsamic Vinegar Dressing Recipe

    Ingredients
    •    1 tablespoon Brown or Dijon Mustard
    •    4 tablespoons Extra Virgin Olive Oil
    •    1 tablespoon Balsamic Vinegar
    •    1 dash Worcestershire Sauce
    •    pinch salt & pepper
    Cooking Directions
    1. put the mustard in a large salad bowl, add the olive oil, vinegar, Worcestershire Sauce, salt and pepper.
    2. whisk the ingredients together with a fork or whisk.
    3. add salad greens to bowl and toss, then add additional salad items and toss again.
    4. serve in individual bowls.

    Mayonnaise Recipe Yum! How to make Mayonnaise

  • Probably The Best Way To Hook Up A Generator To Your House

    Wandering through YouTube, I found what may be the best way to hook up a generator to your house. Its brilliantly simple and safe. Manual transfer switches require wiring inside the electric panel, generator interlocks a bit less wiring. This rig, technically called a meter mounted transfer switch, no wiring.

    Best way to hook up a generator
    Image from Generlink.com

    Instead of messing with your electric panel, this unit sits between your utility meter and the electric panel on the outside of your house. An electrician or your utility company has to install it, but it should only take about 30 minutes to do. And, in most cases, no electrical or building permits. How cool is that?

    I have a transfer panel in my basement to hook up my generator to the house, and it isn’t the perfect solution. My post about it here. You have to run a wiring harness from the transfer panel into the main panel, choose which circuits to control, splice the wires together, its some work to do it all. This meter mounted transfer switch is much closer to ideal. More info on the unit here.

    The meter mounted switch supplies power to the whole panel, and you choose which circuits to run based on the wattage of your generator and the appliances you want to use. The beauty is you can turn on and off breakers at will. With a hard wired transfer panel, you can’t change which circuits are powered. My transfer panel only has one 220 volt circuit breaker, so it limits what large appliances you can run. With this unit, you can turn off and on different appliances that draw a large amount of power.

    Run your electric dryer, then turn it off and turn on the air conditioner or the well pump. Nice.

    The other plus here is many people have a portable generator and plug multiple extension cords into the generator and run them into the house. You can hook up your central AC or well pump with an extension cord. So yes, at this writing, this is the best way to hook up a generator to your house.

    Watch this video by Steve Maxwell, its a nice visual of how it works:

    Hook Up A Generator To Your House – GF Video


  • Grow Apple Trees From Seed? & Acorn Flour – GF Radio 460

    Eric and Rick talk about Olive tree problems due to climate change. Flies are ruining the fruit because it no longer frosts in Southern Italy. Listen on the GastroPod podcast

    Andrea asks on our Facebook Discussion Group about growing apple and pear trees from seed. We suggest checking out the Fedco Seeds Tree catalog for great info and plants.

    Instant Pot issues Eric is having with cooking Pork Shoulder. What are we doing wrong?

    Kathlean suggests sending Acorn flour for Eric to experiment with.

    Rick and Eric love the 99% Invisible podcast and their blog posts. And Eric likes the WebUrbanist site


    Urban Farming In Your Front Yard & Workshop Organizing – GF Radio 456

  • Your Water Heater Burner Goes Out, Here’s One Reason

    Friend calls me, his water heater burner goes out every time it tries to heat the water in the tank. We re-light the pilot light, and the burner – the big ring of fire that looks like gas kitchen range burner –  keeps going out or wont light at all. So I call my plumber friend. He already knows what’s wrong.

    Here’s the short answer to why the water heater burner goes out. The water heater is starved for air. There’s just enough air getting into the burner area for the pilot light to work, but not enough to sustain the big ring of fire. (Now you have the Johnny Cash Ring of Fire song in your head)

    Walking the Labs in the city this afternoon, I finally had a great visual to explain this all to you. On the curb, waiting for the recycle pickup, was an upside down gas water heater. It was a perfect opportunity to show how air gets into the burn chamber of the rig, and why it can get starved for air.

    Water Heater Burner Goes Out
    Air vents for burner on bottom of water heater

    There are two vents on the bottom of the heater with very small slits, and the whole tank rests on a metal ring that has oval holes cut into it. This metal support ring is wrapped with a filter material. Air for the burner goes through these big holes, and then through the small slits into the burn chamber.

    But keep in mind water heaters are usually in the basement, and many basements aren’t the cleanest places. Lots of dust. The water heater draws in air at a pretty good rate, and along with that air it pulls in dust.

    Eventually enough dust, despite the filter material wrapped around the stand ring, clogs the small vent slits under the burner. Enough air still gets through to keep the pilot light lit. But when the thermostat on the tank calls for the burner to fire up, it fails because it is starved for air.

    The first fix to try when the water heater burner goes out is simple. Clean those tiny vents.

    Why The Water Heater Burner Goes Out
    Pull aside the filter fabric, insert brush, clean.

    For this you can buy a furnace brush (affiliate link). Pull aside the filter material around the ring, and run this brush back and forth across the bottom of the tank, cleaning the vents. If you can get a vacuum hose under there after brushing, all the better.

    Water Heater Burner Goes Out
    This brush saves the day. Go get one.

    After watching my plumber friend fix the problem heater, I bought two of these brushes, one for me and one for my friend. A very cheap solution. And a reminder to keep your basement clean.

    Buy the water heater cleaner brush here (affiliate link)

    Clean A Dirty Tin Ceiling & Prepare For Painting

  • Clean A Dirty Tin Ceiling & Prepare For Painting

    To show you how to clean a dirty tin ceiling, I took some photos to show you how we clean one in preparation for painting. You can also use this method to just clean most tin ceilings that don’t need a fresh coat of paint.

    This paint job was a tin ceiling in a small kitchen, and the tin ceiling was covered in grease from the stove. You can see in the picture below how stained the tin ceiling is. The lighter areas are where we did spot cleaning to see how bad the grease on the ceiling was.

    Clean a dirty tin ceiling
    Kitchen Grease on Tin Ceiling

    To to clean a dirty tin ceiling, we first cover all the counter tops and floors with plastic. We wore paint coveralls and gloves, goggles, and masks to shield ourselves while cleaning the ceiling.

    We then used TSP (Trisodium Phosphate) mixed according to the package directions in a bucket of warm water on the ceiling. We used large sponges to apply the TSP to the ceiling and then removed the cleaning solution and grease with sponges soaked in warm water. It took several applications of the TSP to get the tin ceiling clean.

    TSP is a strong cleaner! Follow all label directions and safety guidelines on the box, OK?

    Clean a dirty tin ceiling
    See the difference cleaning the ceiling makes

    If your ceiling has grease on it or is stained yellow, you have to remove this stuff before painting. The paint wont stick to grease.

    Clean a dirty tin ceiling
    After cleaning one area, you can see the contrast

    It took a whole day to clean the ceiling, applying the soap several times, then allowing the ceiling to dry before painting the ceiling. We used a 3/8″ nap roller and a high quality latex paint.

    Materials List

    TSP Surface Cleaner

    TSP P Free (less harsh cleaner)

    Cleaning Sponges (you will need a bunch of these)

    Chemical Resistant Gloves

    Safety Goggles

    Disposable Coveralls

    Have you cleaned a ceiling? What was your experience? Tell us below:

    Spilled Paint Cleanup!

  • There’s A Food Show For Everything – GF Radio 459

    Rick joins Eric to talk about eclectic DIY (what else?) and important stuff like phone security.

    Traveling is important to get outside your world, Eric went to Europe, Rick went to Vietnam (not by choice)

    Cell Phone Manufacturers aren’t making your phone slow, the apps are. And with the IOS phone update, best to do a clean start. https://www.nytimes.com/2017/11/15/technology/personaltech/new-iphones-slow-tech-myth.html

    Smoked meat tube from Underground Meats  What Fun! http://www.undergroundmeats.com/butcher-gift-tube/2017

    Eric’s fondness for this childhood state continues with the Wisconsin Foodie PBS show. Watch on the apple TV box and iPad PBS app. Watch on YouTube https://www.youtube.com/channel/UCuYmq0VTjqzSKYMkViyhs4g

    Costco LED shop lights on sale right now, they would make a great DIY grow light, here is a video of some of ours.

    Repair of the mini greenhouse: https://www.youtube.com/watch?v=Auk2b49rQdU

    Seed Starting How To & Email Reminders GF Radio

  • Urban Farming In Your Front Yard & Workshop Organizing – GF Radio 456

    Starting a market garden in your yard, both the front and backyards, is what Curtis Stone did, who has a great YouTube channel that Eric has learned a lot of gardening tips from. His website has books and video classes and in-person classes.

    We really like the workshop redesign that Erik of Root Simple did.

    Eric put roller blade wheels on his office chair, here is the post.

    Erin of The Impatient Gardener is reworking her most excellent website and has a very good post on the new invasive worms. You can also hear her on a recent GF Radio show.

    Rick is repairing his mini greenhouse and planting swiss chard, a versatile vegetable. Watch our mini greenhouse video builds here

    Rick is on a food fermentation mission,  you can hear Sandor Katz, the fermentation expert on this GF Radio episode.

    Rick also likes the Troy-Bilt Flex Log Splitter, here is my video review on the log splitter. Troy-Bilt is a sponsor of GF.

    Eric tells of his negotiating techniques for buying something from Craigslist.

    Eric is going to modify his maple syrup evaporator firebox, Maple Trader has a great discussion group:

    This post may contain affiliate links which won’t change your price but I earn a commission from. Thx! it does not affect the prices you pay: http://amzn.to/2zpkk5i

    Support GardenFork, become a monthly supporter on Patreon, via PayPal.

    GardenFork’s Facebook Discussion group: https://www.facebook.com/groups/1692616594342396/

  • Oven Baked Sweet Potato Dog Treats Recipe – GF Video

    This Oven Baked Sweet Potato Dog Treats Recipe is wicked simple. And probably the easiest dog biscuit recipe you are going to find. Here’s my video on how to make them:

    How to make this sweet potato dog treats recipe:

    Making these treats is the polar opposite of complicated rocket science. But it took a while to figure out how to do this right.

    The sweet potato dog treats you buy in the store are, besides being expensive, not falling apart and crumbling in your hands. I tried to make these several times and mine never would stay intact.

    But I persevered as I didn’t want to pay the high prices these dog treats get in the stores. I don’t blame the makers of these treats for making money, its how we all pay the bills. I imagine the packaging also makes these treats expensive, I have seen them in stores in hard plastic containers or those foil-plastic bags. Not cheap.

    Easy enough to start out here. Hopefully you have or can borrow a mandolin. You can pick on up here: http://amzn.to/2hDGt85 (affiliate link)  If not, cut the sweet potatoes into 1/4″ slices, as uniform as possible with a sharp knife.

    Sweet potato dog treats recipe

    BE VERY CAREFUL when using a mandolin. They can cut your fingers. Most have a vegetable holder-guard,  or you can get one of those chain-mail gloves. And put a towel under the mandolin when cutting the sweet potatoes.

    The secret I found in a another version of this recipe that uses a food dehydrator is this.

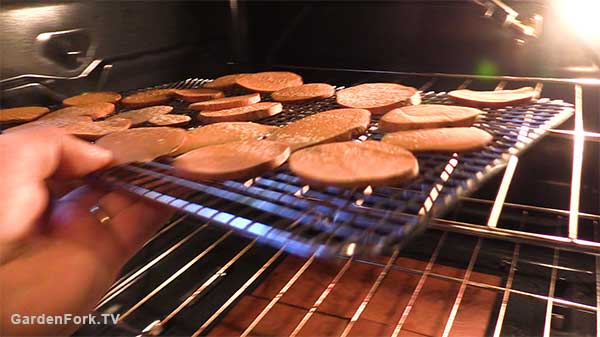
    Spray the sweet potato slices with a very light coating of vegetable oil.

    Sweet potato dog treats recipe

    This allow the dog treats to stay slightly pliable, and they wont crack when being stored.

    In our previous sweet potato dog treat recipe video, we used an electric dehydrator to dry the snacks, but this time I wanted to see how the oven would work. The lowest oven temp on my oven is 170F, so I set it to that and turned it on. The dog treats dried in about 3  hours.

    Sweet potato dog treats recipe

    And how cool is that?

    Sweet potato dog treats recipe

    Sweet Potato Dog Treats Recipe : GF Video

  • Lithium Batteries Aren’t Always Better

    I was talking to a tech support person about one of my weather stations that was not working. I told them that I had put lithium batteries in the outdoor sensors for winter. The tech person said, in so many words, that using lithium AA batteries in the weather sensors was not recommended unless it gets very cold in your area.

    Like sub zero cold more than a few times a winter.

    Of course I can’t remember the exact reason, but the voltage levels of AA lithium batteries can affect the electronics in a not good way.

    So the not working weather station is on its way back to the company that makes them. And I’ve taken the lithium batteries out of my outdoor weather sensors.

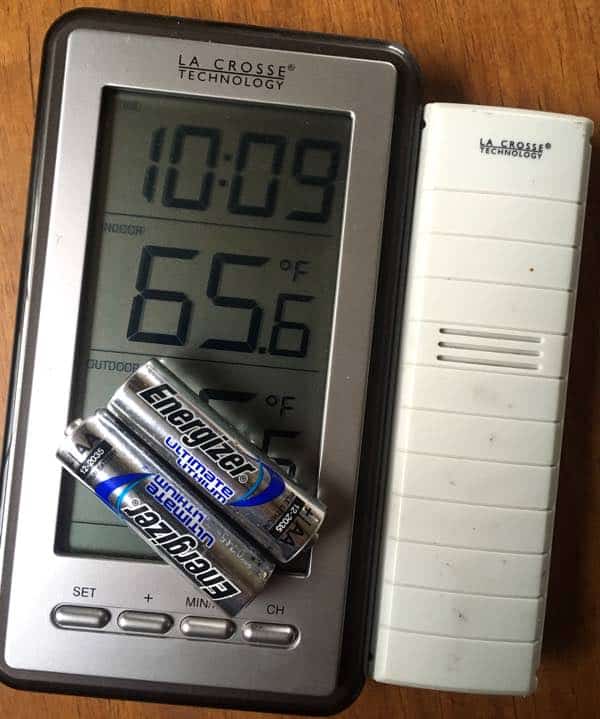
    BTW, this indoor outdoor temp display works pretty well. I have yet to find the best one ever, but I have three of them and they work.

    From what I can tell from various forums, lithium AA batteries work best in flashlights and other high power drawing devices. Weather station sensors are the opposite, just sending a bit of data ever minute.

    Could you fill in the blanks on how lithium batteries affect electronics?

    Storm Preparedness – 3 Must Have Tools – GF Video

  • Rollerblade Office Chair Wheels To Fix Your Broken Desk Chair!

    As soon as I saw the description “Rollerblade Office Chair Wheels” I knew this was the solution to the question: How to fix broken office chair wheels? I have an older Aeron chair, and I have never loved the plastic roller wheels it had. Kinda like those plastic wheels on cheap rollerboard luggage.

    Rollerblade office chair wheels

    BTW, my rollerboard wheels died on the last trip I took.

    BUT, there is light at the end of the tunnel! I ordered these replacement rollerblade office chair wheels (affiliate link) and they were easy to install. Lets walk through the process of how to fix a broken office chair.

    First flip the chair over, and with a screwdriver and a pliers, lift the broken office chair wheels out of their mounts in the bottom of the chair. You will need to wiggle the screwdriver between the wheel and the mount, but they slide out pretty easily.

    Rollerblade office chair wheels

    You don’t need to save the old wheel spindle, please put it in the metal recycle. The new rollerblade office chair wheels come with new ones attached.

    The new wheels are easy to install. Just press the new spindle into the wheel mount. They should slide in easily.

    Rollerblade office chair wheels


    Couple of things to keep in mind when repairing office chair wheels:

    Make sure you order the correct replacement wheels, the spindle diameter is key.

    Order by searching for the brand name of your office chair + roller blade wheels.

    Check the reviews and comments for the wheels you are ordering, make sure they fit and work well.

    My office is in a 120 yr old building. And the floors aren’t level, and my desk is on the part of the floor that is higher than the rest of the room. These replacement office chair wheels work so well I often slide away from my desk.

    But this office chair repair is a great improvement in wheel performance. Plus they look pretty cool. Not sure why I didn’t upgrade to these wheels before, one of those light bulb moments. Gone are years of bad plastic wheels scratching up your floors, get these instead.

    Skil Right Angle Grinder Repair

  • Buy A Tiny House Kit On Amazon?

    You can buy a tiny house kit from several online sites, but Amazon? Yes you can.

    Tiny House Kit

    Not bad for starting at about $5,000 for a house kit. Unless you lived in a warm area year-round, you would need to insulate. But for a starter home, this is intriguing. These lack the wheels that a tiny house kit might come with, but if you have a specific piece of land in mind, it works.

    Tiny House Kit

    Several of the designs look like they are intended as backyard cabins, but I’ve looked at several of the designs and they could work for full time living. The big challenge would be siting a bathroom within the structure, but if you like the outdoors, how about an outdoor shower and outhouse?

    What I do like is the simple way to locate the kit house on cinder blocks. So you could move this on the back of a flatbed tow truck to a new location. Many of the tiny houses are limited by the wheelbase of the trailer they are built on.

    The Allwood brand kits have siding that lock into the next board, making the build pretty easy. Not sure how much cutting is involved.

    This would probably have more appeal if you are looking for a seasonal tiny house, instead of an all season house. Put this up on a piece of land and spend long summer weekends. Run some solar and collect rainwater from the roof, you are good to go.

    Pick up a how to tiny house book if you aren’t ready to hit the go button just yet. Also check out Deek Diedricksen’s website, RelaxShacks.

    Since I already have a small-ish house, one of these kits would make a nice office, I’m thinking. What are you thinking? Let me know below.

    Build an Outdoor Shower

  • Simple DIY Chalkboard With A Pallet Wood Frame – GF Video

    Really nice DIY Chalkboard you can make in less than an hour. We use chalkboard film and pallet wood to simplify the project. Watch the video below, then read through the instructions and photos:

    DIY Chalkboard Parts List

    Chalkboard Film, aka contact paper 24″ wide

    Flat Black Spray Paint

    1″ drywall screws

    Picture Hanging Wire

    24″ x 24″ MDF or smooth plywood (avail at local home center)

    Flip Bit Drill & Screw Driver

    Cordless Drill

    DIY Chalkboard Pallet Project

    Cut your pallet wood to size, the top piece of wood will be 24″ wide. Depending on the width of the pallet wood you are using, the sides and bottom lengths will have to be measured. Note how there are no angle cuts in this frame layour. This is the same layout used for all of the windows in our house, which I love because its simple and it works.

    Spray paint the edges of the MDF or plwyood, and the front and sides of the pallet wood frame pieces. They will dry quickly if you use flat paint. You can also stain this wood, or use a poly-stain. Poly stains are a tinted polyurethane. Saves some time in the process with that product.

    DIY Chalkboard Pallet Frame

    The film I used is 24″ wide, so its a perfect fit for the MDF. Pull back about an inch of the backing paper of the chalkboard film, and align it with one edge of the MDF/plywood. Smooth down that edge from the center to the outside corners. Then pull the backing paper off slowly, laying down the chalkboard film as you pull. Keep the film aligned with the edges of the MDF, and do your best to pull out the wrinkles in the film.

    After you lay down the film, put the backing paper over the front of the film, and smooth out the wrinkles from the center outward with a flat edged tool. A dough scraper from your kitchen works well.

    DIY Chalkboard

    Dry fit the pallet wood frame over the top of the chalkboard film. Use a flip bit to drill pilot holes through the pallet wood that frames your DIY chalkboard. This keeps the wood from splitting when you screw into it.

    DIY Chalkboard

    We added picture frame wire on the back of the DIY chalkboard to make it easy to hang.

    DIY Chalkboard Pallet Project

    Picture hanging wire has this neat trick when you wrap it back on itself. The wire grabs onto itself, no knots needed.

    DIY Chalkboard Pallet Project

    How cool is that! What fun. Let me know suggestions below, thanks!

    Easy Flower Box You Can Make

  • What To Have When. Storm Preparedness GF Radio 451

    Storm and Disaster Preparedness, and what emergency supplies to have is a running theme on GardenFork. Today Rick and Will take over the podcast to what to be prepared for and how to create a simple plan. This is National Preparedness Month, after all.

    What kind of storms and natural disasters happen in your area? The most common of these should be the focus of your emergency prep. Keep these items dry, you may want to put them in zipper plastic bags. You can pretty large zipper bags, btw.

    Duracell batteries now last 10 years, according to the manufacturer, so I buy a large pack of D and AA batteries. Keep these batteries in their packaging. If loose in a bag, they can contact each other and possibly drain power.

    Will has some good points for keeping kids busy during power outages, with a pack of fun items that are only allowed to be used during a blackout. Smart of Will to have this.

    3 must have tools to prepare for power outages.

    For more on what items to have in an emergency what Eric in this video.

    If you like to play with fire, and get your kids learning about how to make do with what you got, here’s a fun vid:

    DIY Emergency Stove
    DIY Emergency Stove

    While Will and Rick to the heavy lifting, Eric is being interviewed on the Popular Mechanics Most Useful Podcast Ever.

    Disasters Don’t Plan Ahead. You Can.

    Topics Covered on Today’s Show

    1. Identifying what you should be prepared for!

    2. How to build out a simple plan to be ready

    3. Tips and Tricks on Power, Lights, Water, Food, and Safety

    Storm Preparedness Items Mentioned:

    Midland Alert Weather Radio: http://amzn.to/2fBkr4V

    Red Cross Weather Alert Radio: http://amzn.to/2xocp94

    Heavy Duty Extension Cord: http://amzn.to/2yerR55

    Light Duty 100′ cord: http://amzn.to/2yqHXJU

    Power Strip: http://amzn.to/2x51Sw9

    How To Connect A Generator To A House
    How To Connect A Generator To A House Video

    Disaster Preparedness Websites we referenced in the show:

    www.ready.gov A great site that gives simple tips on how to get ready for any disaster in your area

    https://www.cdc.gov/disasters/ A great second resource for to plan ahead with easy tips that can help anyone in a time of need

    Podcast On Generators and Transfer Switches
  • Use Soap On Cast Iron? Waffle House Does

    To use soap on cast iron is a super hot button topic in the cast iron cooking world. I know because of the cast iron videos and posts I have made.

    I happen to be in Waffle House, one of my favorite places to be, sitting at the counter, another favorite place. I noticed that the dishwashing station is under the front counter. And there they were, the cast iron pans they cook eggs in, being washed with soap.

    use soap on cast iron

    People have been told, and repeat, to use soap on cast iron will ruin the pan. It washes off the seasoning. Some comments from our YouTube channel:

    “I season my cast iron the old fashioned way with lard and i tell you from experience that dish soap strips the finish right off it to where everything sticks like glue.”

    The flip side:

    “I have used soap on my cast iron all my life, just like my mother and grandmother did, and I’ve never had a problem. After washing and drying a give the pan a light coating of oil before putting it away, whether it’s going to be put away for a few minutes or a few weeks or months.”

    I grew up being told not to clean a cast iron pan with soap, and to use salt to clean our stuff that stuck to the pan. This never seemed to work very well. So I used some soap and a plastic scrubber pad, and it worked just fine. No one knew the difference, and the world did not come to an end. After washing, I oiled the pan and let it dry. Done.

    And I’m totally OK with that. Are you? Watch this video:

    Use Soap Cast Iron

    I do a deep dive on can you use soap on cast iron in this post here.